|
|
Have you enjoyed my work? |
|
|
|
|
|
Have you enjoyed my work? |
|
|
As I write this it was almost two years ago, in October 2018, Robert Pearce released his Traveller Geomorphs PDF, which is an amazing resource for any Science Fiction RPG, providing ready made map tiles "Geomorphs" which can be mixed and matched to create maps or map sections of starships, bases, or city building locations. While this PDF is amazing it has one fatal flaw in my eye - the PDF contains vector rendered images - which means that they are not easily editable as an image file on a computer and that creating map layouts on a computer for uses such as a Virtual TableTop (VTT) was not easily done. I've fixed that flaw.
| Last Update |
Blog Posts by Robert Pearce |
PDF Files by Robert Pearce |
|---|---|---|
| 10/21/2018 | Traveller Starship Deck Plans | Traveller Starship Deck Plans |
| 07/26/2020 | Starship Traveller Starships v2.0 | Starship Traveller Starships v2.0 |
| 8/1/2020 | Starship Traveller Starships Symbols | Starship Traveller Starships Symbols |
| 12/18/2020 | Adventure Class Starship Geomorphs | Adventure Class Starship Geomorphs |
| 12/31/2024 | Adventure Class Geomorph Blanks | Adventure Class Geomorph Blanks |
Robert's release kicked me into gear rendering these PDFs into image files which can be edited and combined to create starships and larger maps.These archives presents the Geomorph tiles in PNG format with transparent floor backgrounds. This allows you to overlay the images on a square or hexagon grid or no grid at all (baseplates with pre-rendered grids are provided in the archive). Or you can toggle the grid, as I did in my sample maps below. Some of the tiles are even designed to Overlay other tiles; for instance, a Cargo Bay tile may be presented empty with a Cargo Overlay to fill the bay.
The Standard Resolution tiles are scaled to 60 pixels per 5 foot square. This conveniently works out to 1 pixel = 1 inch,
making a 1 yard hex 36 pixels across. The High Resolution version of these tiles
are 5x the resolution (300 pixels per 5 foot square; 180 pixels per 3 foot hex;
5 pixels per inch).
You can download the archive, which is zip format. These files, as with Robert's original work, are released under
Creative Commons Attribution Non-Commercial 4.0 International License.
| Last Update |
Zip Files Standard Resolution |
Last Update |
Zip Files High Resolution |
|||
|---|---|---|---|---|---|---|
| 6/6/2022 | Geomorphs, Symbols, & Small Craft | 52 MB | 6/6/2022 | Geomorphs File HighRes | 74 MB | |
| 6/7/2022 | Custom Tiles | 31 MB | 6/6/2022 | Symbols & Small Craft HighRes | 17 MB | |
| 6/6/2022 | Geomorphs Starships 2 | 36 MB | 6/7/2022 | Custom Tiles HighRes | 47 MB | |
| 6/6/2022 | Geomorphs Starships 3 | 56 MB | 6/6/2022 | Geomorphs Starships 2 HighRes | 73 MB | |
| 1/19/2025 | Adventure Class Geomorphs | 51 MB | 1/19/2025 | Adventure Class Geomorphs HighRes Part 1 | 51 MB | |
| 1/19/2025 | Adventure Class Geomorphs HighRes Part 2 | 53 MB | ||||
Adventure Class contains all of the tiles from the Adventure Class
Starship Geomorphs PDF.
1/19/2024 Update: Fixed naming issues some of the Asteroid geomorphs and
added more Asteroid Edge geomorphs.
1/6/2024 Update: Fixed naming issues with many of the files. Release of
the High Resolution files.
1/3/2024: Initial release.
Geomorphs contains the main set of tiles and small craft from the
Geomorphs PDF.
6/6/2022 Update: Minor file updates.
9/13/2020 Update: Created a 40-dTon Saucer Launch for tile 316
and a Fast Launch for tile 519. Moved the lower resolution Symbols set into the
Custom Tiles zip files, since I'll likely be updating them more than the main
Geomorphs file.
9/16/2020 Update: Corrected errors in tiles 371, 391, and 509.
Found a new PNG compression algorithm which cut about 20MB off the file size of
the zip file.
Custom Tiles contains over 1,000 custom Geomorph tiles I've created. A large number of these tiles
were created by modifying the various Bridge and Engineering
sections from the Symbols PDF, adding a Geomorph style door and setting them so
that they line up with standard Geomorphs tiles. All of the rest I created
either by modifying existing tiles or from scratch using the Symbols PDF. I separated these out
partly because as I continue to work on this project I keep adding tiles, so
this file is likely to be added to as time goes on.
6/6/2022 Update: Added tons of new tiles. A lot of 50x50 tiles,
many of which are suitable for edge, corner, or neck placement. A folder of
50x50 Build It tiles. I originally intended to use this to build rounded corner
tiles with elevator/stairwells for vertical map building, but this quickly
turned into building any rounded corner tiles, then other 50x50 square tiles for
internal placement.
8/30/2020 Update: Added more new Bridge modules, taking the
previous Bridges and overlaying them over a either a pointed or rounded nose
section (think something like the Suileman-Class). I've added several example
maps using these tiles below.
9/6/2020 Update: More Bridge modules. New sets of both Pointed
and Rounded nose variants with
Air/Raft and Medical bay behind the bridge.
9/13/2020 Update: Moved the lower resolution Symbols set into
this file. Added some new Lockers with iconographic labels.
Geomorphs Starships 2 contains 11 more starships released by Robert Pearce, most of which were included in his Deck Plans Collection PDF while the rest can be found on his Blog. These files are presented in layered Photoshop (PSD) file format. PSD files can be opened in Photoshop, of course, but with a plug-in can be opened in Paint.net (more on that below) and likely other image editing programs with appropriate plug-ins. More basic versions of these maps are contained in the Geomorphs archive in PNG format.
Geomorphs Starships 3 contains several ships built using some sample Geomorphs I've created using
Robert's tiles and Symbols (which are presented below in PNG format).
As with Starships 2, these maps are in Photoshop format with multiple layers,
allowing not just the different decks to be toggled on and off but also some
extras, including pop-up weapons in extended or retracted position, cargo in the
cargo bays can be toggles, and Air/Rafts and other smaller crafts carried by the
ship can be toggled (or you can toggle the main ship off, allowing you to
present just the smaller craft on the map).
6/7/2022 Update: Added the 60-dTon modular Runabout, various
modules, and loadouts built from the modules.
8/30/2020 Update: Added two new Courier/Scout variants and the
Lightning Bug v2 using the new map tiles. Updated the Luxury Liner to be a
little bit bigger and added a second elevator core near the rear of the ship.
9/5/2020 Update: Added Bartizan-Class Carrier and Ground Base.
9/7/2020 Update: Added several new shuttles using the new
Aerofoil tiles I've added.
Symbols High Resolution contains PNG images of the Symbols PDF, with each individual item saved into a separate PNG file. Like the Geomorphs, these files have a transparent background allowing you to compile multiple pieces together to create your own Geomorph tiles, or even to just create unique rooms using the furniture and machinery. A standard resolution version of this file is included in the main Geomorphs archive. This archive contains higher resolution versions of those files at 300 pixels per 5 foot square (300 dpi). This is 5x larger than the Geomorps tiles, so if you intend to create tiles using these Symbols the final file you export will need to be reduced in size to 20% of it's original size. I do recommend you keep the larger original files, though, as I intend to release 300 dpi versions of those tiles at a later date and you will be able to use anything you create from Symbols with that version of the Geomorphs if you desire.
These tiles are designed to be more customizable, which also means that you may need to prepare them for your use. I purposely removed the square grid from the geomorphs and gave the tiles a transparent background. This will allow you to put a hex or square grid either under or over the tiles and to customize the colors of the grid if you wish. If you put the grid under the tiles then it won't be visible over furniture and machinery; however if you want you can lay the grid over the tiles, showing it across obstacles. While the transparent background should be treated as white by programs that won't be using the transparency, it's possible it won't by some software (possibly VTTs) which means you will may need to open the images and give it a white background to make them display correctly. And since no grid is built into the tiles, you can easily add one, but it does mean that you will have to add one if you want a grid.
In the Baseplate folder there are a number of PNG files which can be used to build your maps. The PSD file (Photoshop format) contains all of the other files in layers, so you won't have to manually add them and can just open one file. The Checkerboard file can be used help you align the Geomorph tiles when building a larger ship. Each square on the board is 600 x 600 pixels. This is 50 feet, or 10 map squares, to a side and is the same size as one of the Corner Geomorphs. An Edge Geomorph would be the same size as two of these squares, while a Core is 2x2 squares. There are also alternate versions of both the Hex and Square tiles, allowing you to choose the one you would prefer to use for your designs. Simply add them as extra layers in your image editing software.
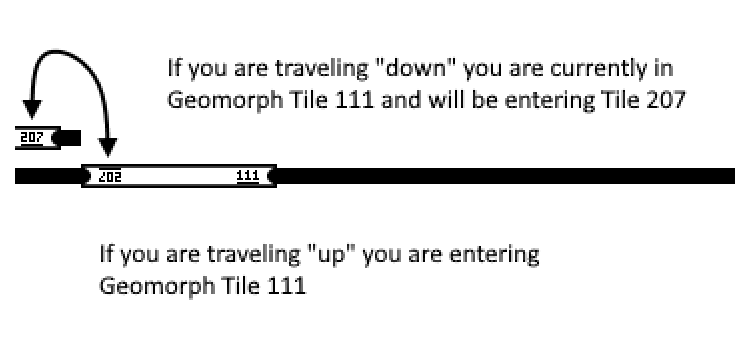 One
small addition I made to the images is to add the tile number to the doors as
you enter the tile. This preserves which tiles you used to create your map, and
allows you to look up the tile in the Geomorphs PDF to get more information on
it. When properly aligned the number from both tiles can be seen on the door,
with the number underlined and the tile "above" or "up" from
the number in the lower-right of the doorway.
One
small addition I made to the images is to add the tile number to the doors as
you enter the tile. This preserves which tiles you used to create your map, and
allows you to look up the tile in the Geomorphs PDF to get more information on
it. When properly aligned the number from both tiles can be seen on the door,
with the number underlined and the tile "above" or "up" from
the number in the lower-right of the doorway.
I do most of my editing in Paint.Net, which is a free image editing software suite for Windows which supports a large number of plug-ins. Included in the Geomorphs archive is a folder for Paint.Net with dll files for two of the plug-ins I highly recommend if you want to use Paint.Net to edit these Geomorphs. These plug-ins (or indeed Paint.Net itself) are not required, but I find them very useful. To install these plug-ins you simply just need to move them to appropriate folder in the Paint.Net install folder located in your Program Files (normally this will be C:\Program Files\paint.net). If you wish you can download these plug-ins directly from the sources, from the links below.
The PSD plug-in for Paint.Net allows it to open and save to Photoshop PSD format. There are a lot of advantages to using PSD file format for saving your designs. First, PSD has become a fairly standard file format which can be opened by a large number of image editing programs, allowing you to share the files. Second, PSD supports multiple layers within the image. While Paint.Net has a native file format called PDN, this format can only be opened in Paint.Net. Multiple layers can be used for many different things.
PSD format does have one big disadvantage over PDN format: The save file size is big. It's downright huge. A file which is 16MB in PDN format can be over 400MB in PSD format (yes, almost 30x larger). However, PSD file format is very compressible. If you use File and Folder compression on your drive you can significantly reduce that file size (to something more like 50MB). And if you archive PSD files using 7-Zip's 7z compression then PSD files compress to significantly smaller sizes than PDN files can compress to. That 16 MB PDN file I mention zips up to 774KB, while that 400MB PSD file compresses to 64KB (less than 1/10th the size). This, and the compatibility issues, are the reasons I provide some of the files in 7z archived PSD format.
TR's PseudoSnap! plug-in allows you to "snap" image layers to a virtual grid, aligning images more easily. This works especially well on images with long straight lines like the Geomorphs. When properly installed in Paint.Net you can find this plug-in in the top menu under Effects -> Objects -> TR's PsesudoSnap! You will find yourself using this plug-in a lot; if your keyboard or mouse supports it you may want to assign a Macro to go to Alt -> C -> O -> T to quickly access it. Or just get used to hitting those keys quickly.
One thing you'll notice if you look at any of the Geomorph PNG files is that they all have an empty "gutter" around the edges of the tile. This gutter is usually pretty close to 120 pixels - approximately the size of two squares (which are 60 pixels to a side). I say approximately because the walls actually extend slightly beyond that point; the reason for this is because the Geomorphs are designed for the tiles to overlap at the walls. TR's Pseudosnap doesn't treat completely transparent pixels as part of the image, so alignment would be an issue if I didn't use a particular "trick" to get around this. In each corner of each Geomorph tile is a nearly transparent pixel (color 1, 1, 1, opacity 1; or hex code #010101). This allows the tiles to snap precisely to a grid. When you open PseudoSnap! for the first time it'll ask you for the Horizontal and Vertical Grid Size, then for how far you want to align along that grid. Since each square is 60 pixels this is the grid size we're working with, however since the geomorphs normally align to an even number of squares you can increase that grid size to 120 pixels. If it supported it I'd actually suggest you set the grid size to 10 squares - 600 pixels - but unfortunately the plug-in maxes at 200 pixels. So the best option is 120 pixels. This will allow you to move one "small" geomorph 50'x50' section by moving 5 grids in PseudoSnap. A 100' move would be moving 10 grids. Using this you can move tiles horizontally and vertically so that it aligns with already laid tiles. Once everything lines up you can either merge the layers down or just move on to the next tile.
Remember that tiles can be rotated! This allows tiles to be used in even more ways, however you need to be careful when rotating tiles. The easiest way is to rotate the layer using the Rotate and Zoom feature in Paint.Net. Just rotate it 90, 180, or -90 (270) degrees. This should usually work well, however I have occasionally had issues with Paint.Net "blurring" an image when you rotate it; in the case of the geomorphs a "blurring" may result in the walls and doors not lining up precisely. This is not a big deal, but can be a little annoying. Another option for rotating images is in Windows itself; if you right-click on a PNG file the option to "Rotate Right" and "Rotate Left" is available. If you rotate twice this will, of course, rotate it 180 degrees upside down. You can select multiple files and rotate all of them together, if you wish.
Oh, and save your work. Save often. Every now and then save an extra copy under a different file name. There's nothing worse than having a design you've been working on for hours disappear because you forgot to save and have a program or PC crash, or you accidentally save it to PNG and realize you never saved it to a layered PSD or PDN file, making it much more difficult to make further changes.
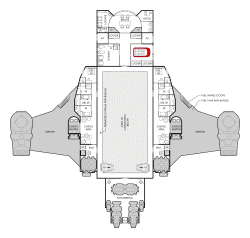
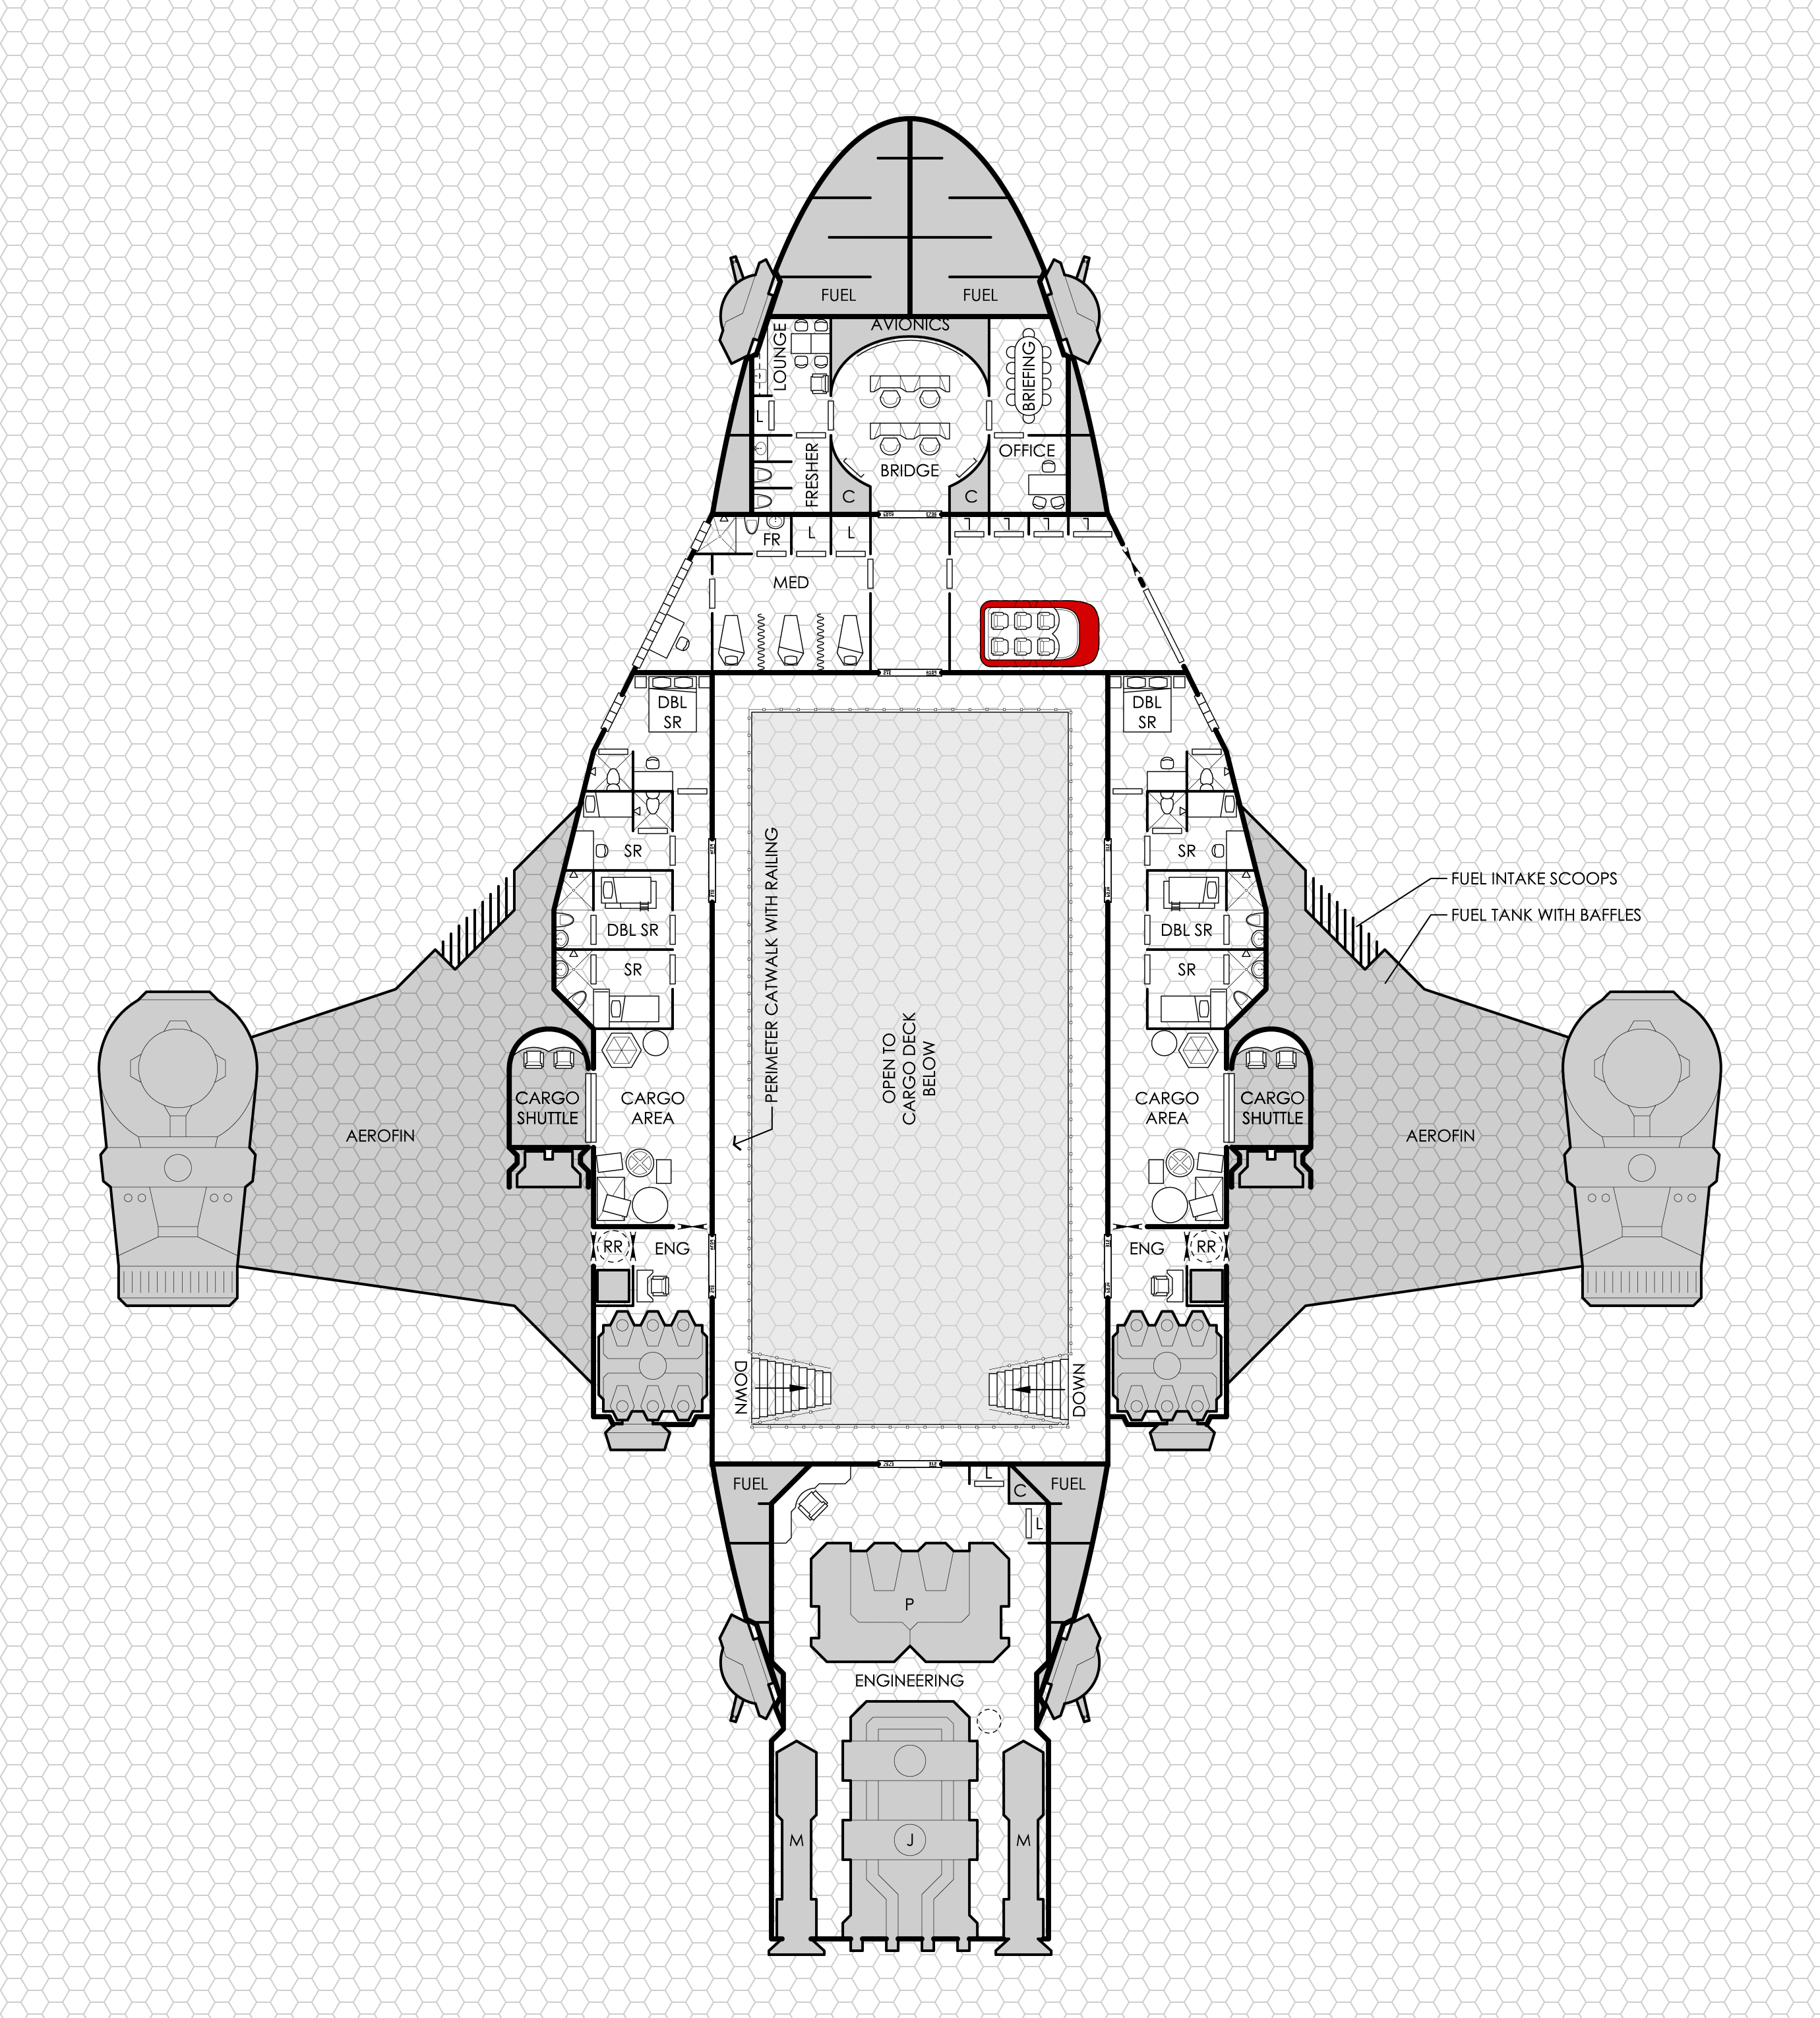
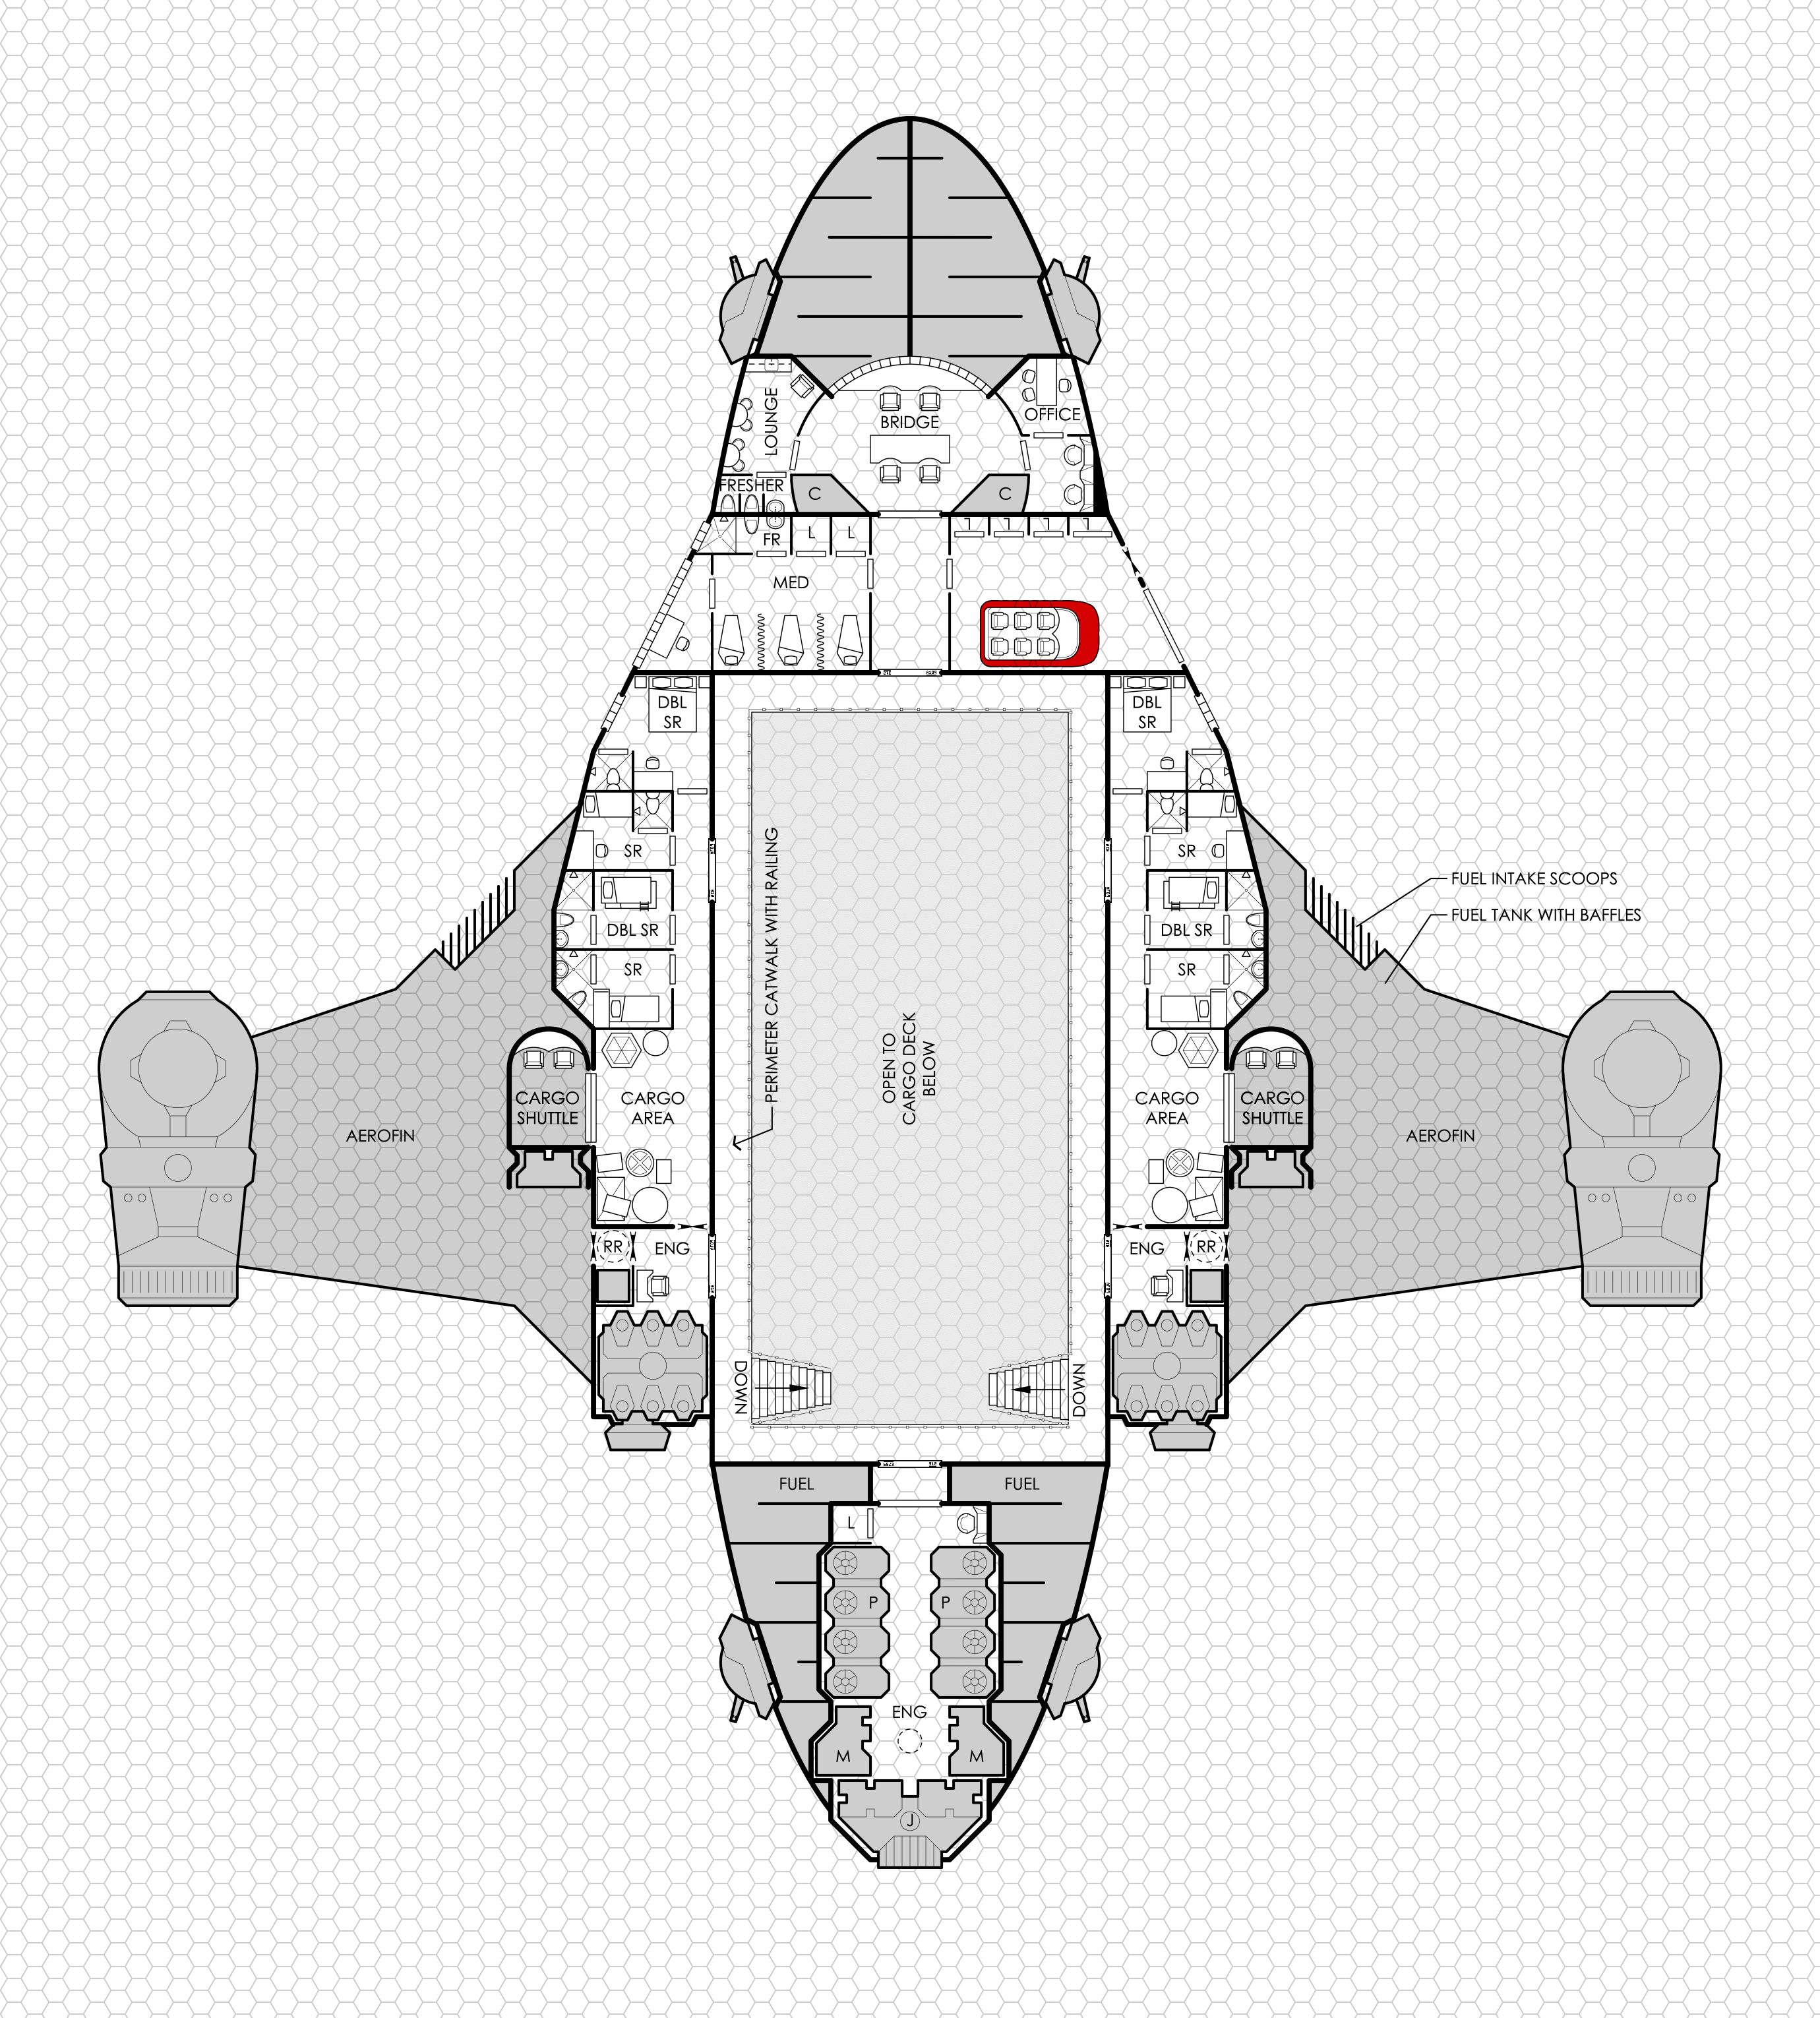
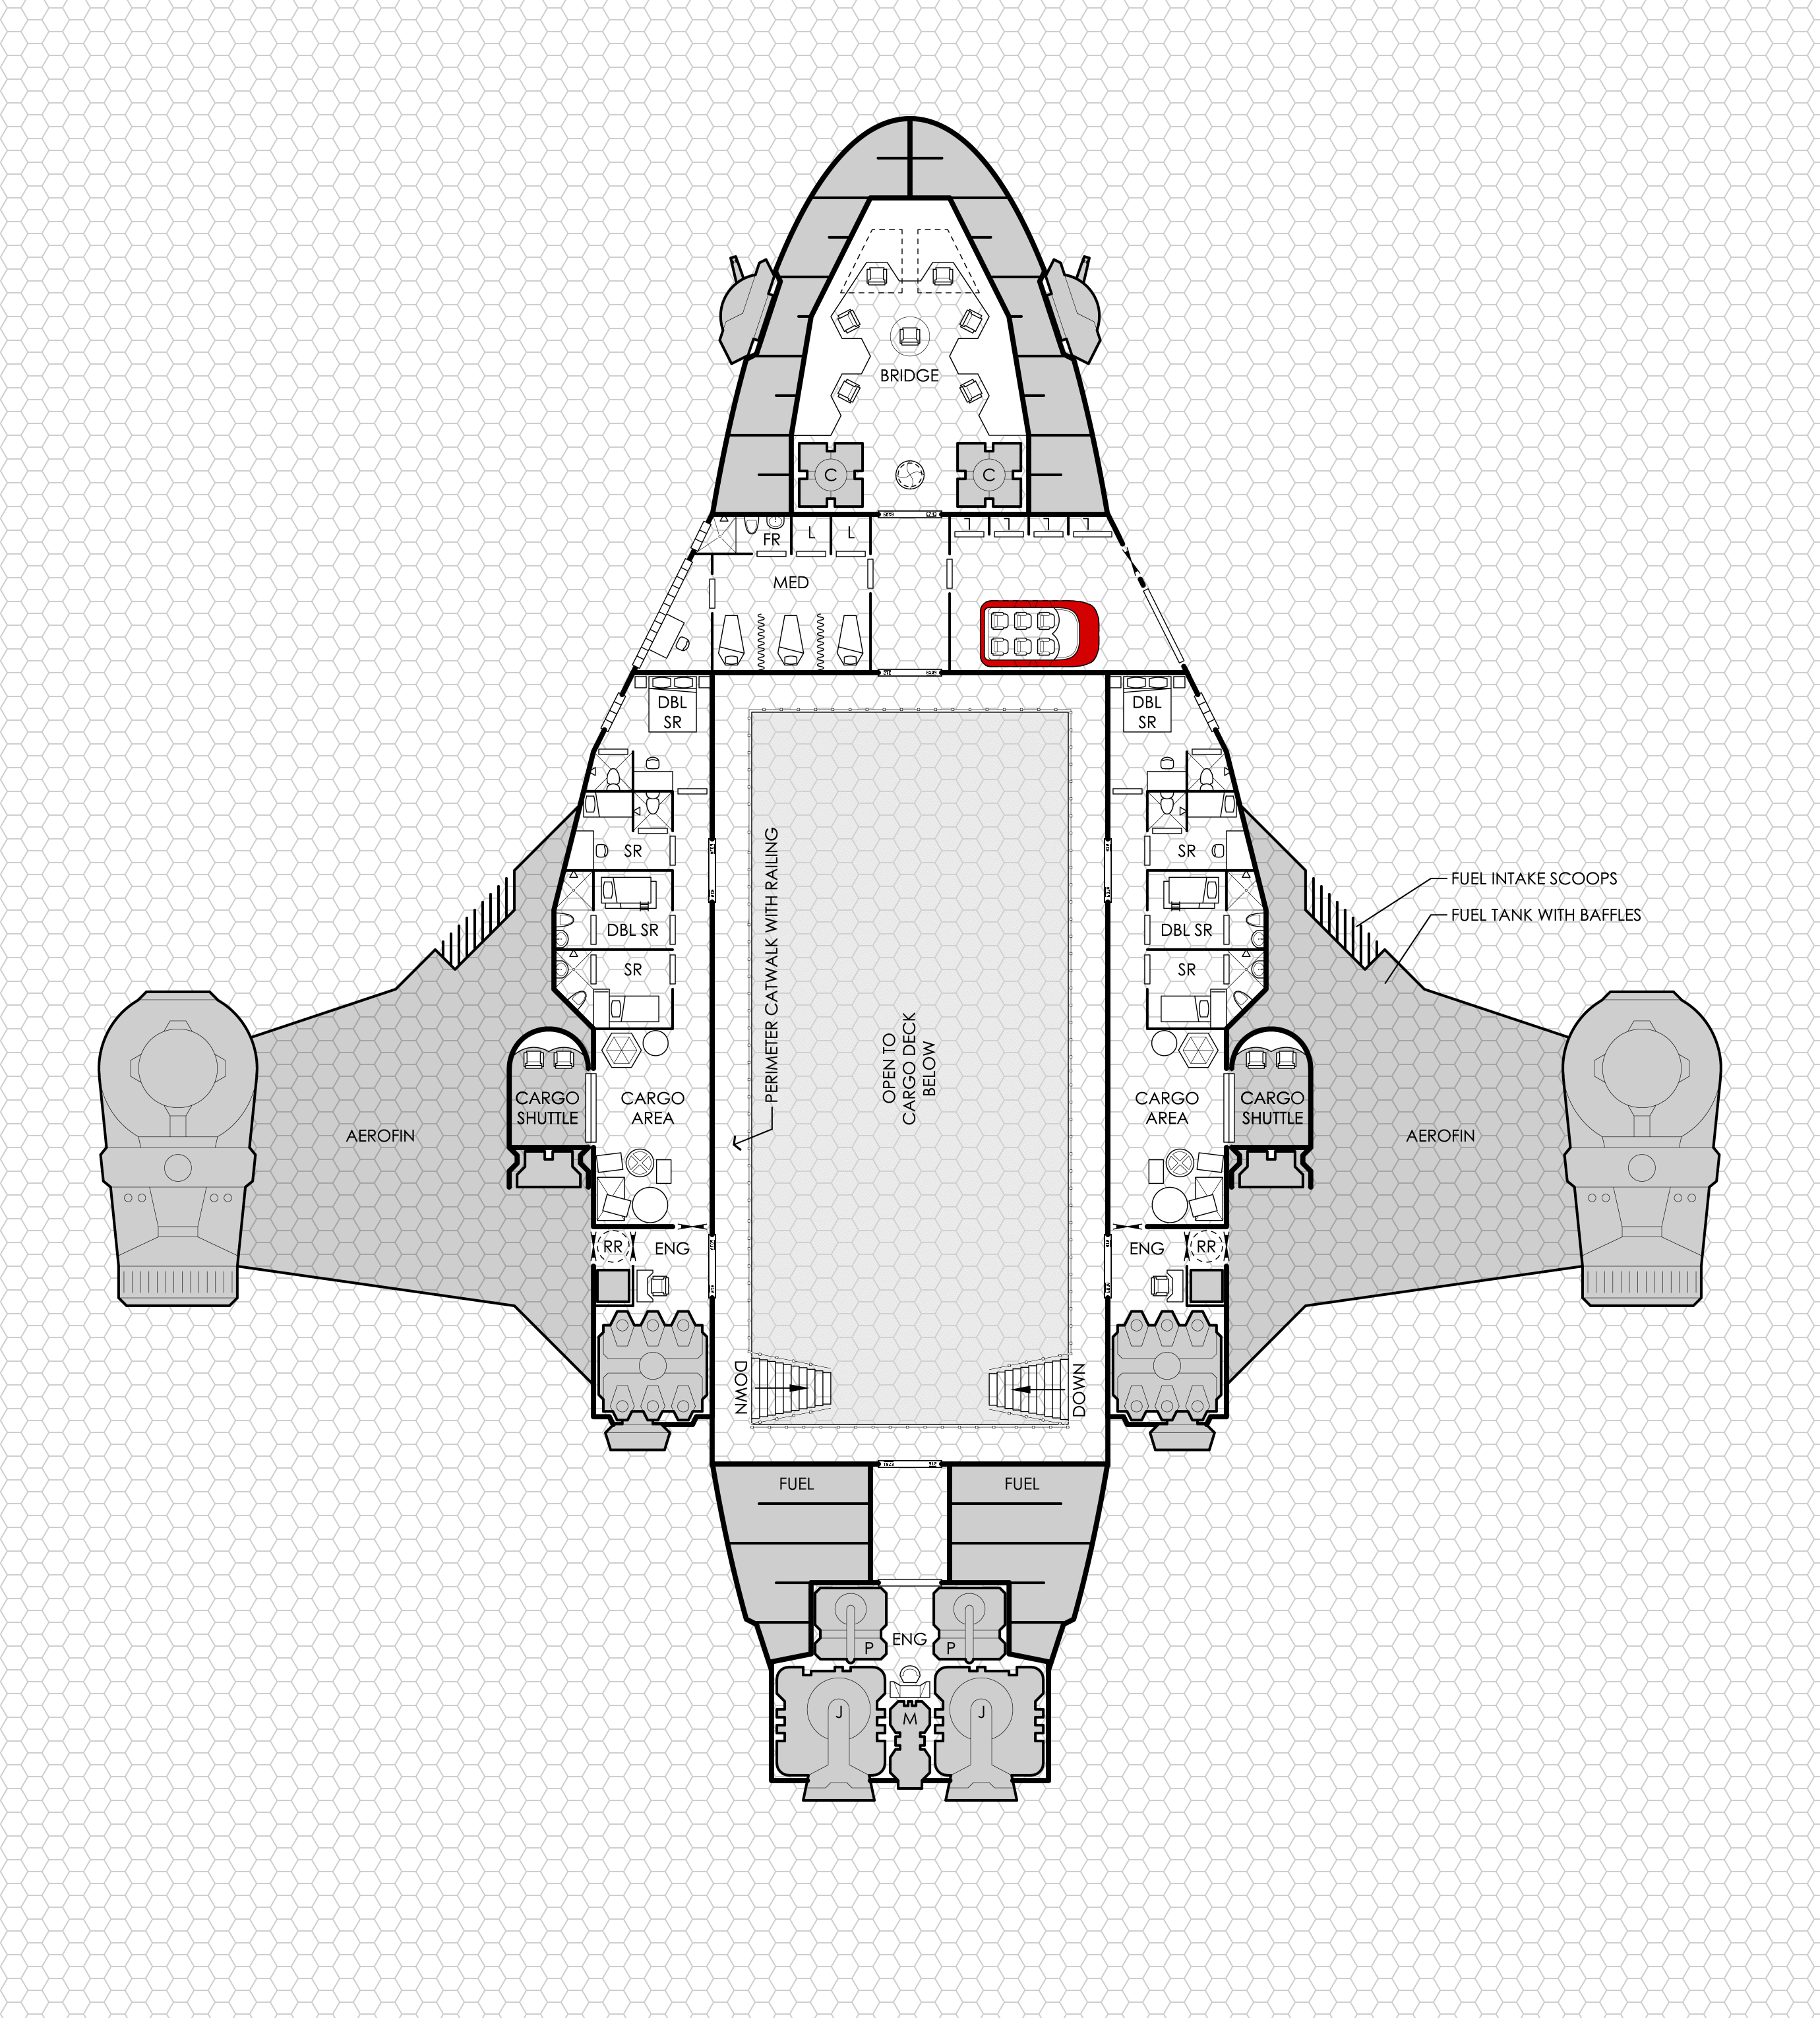
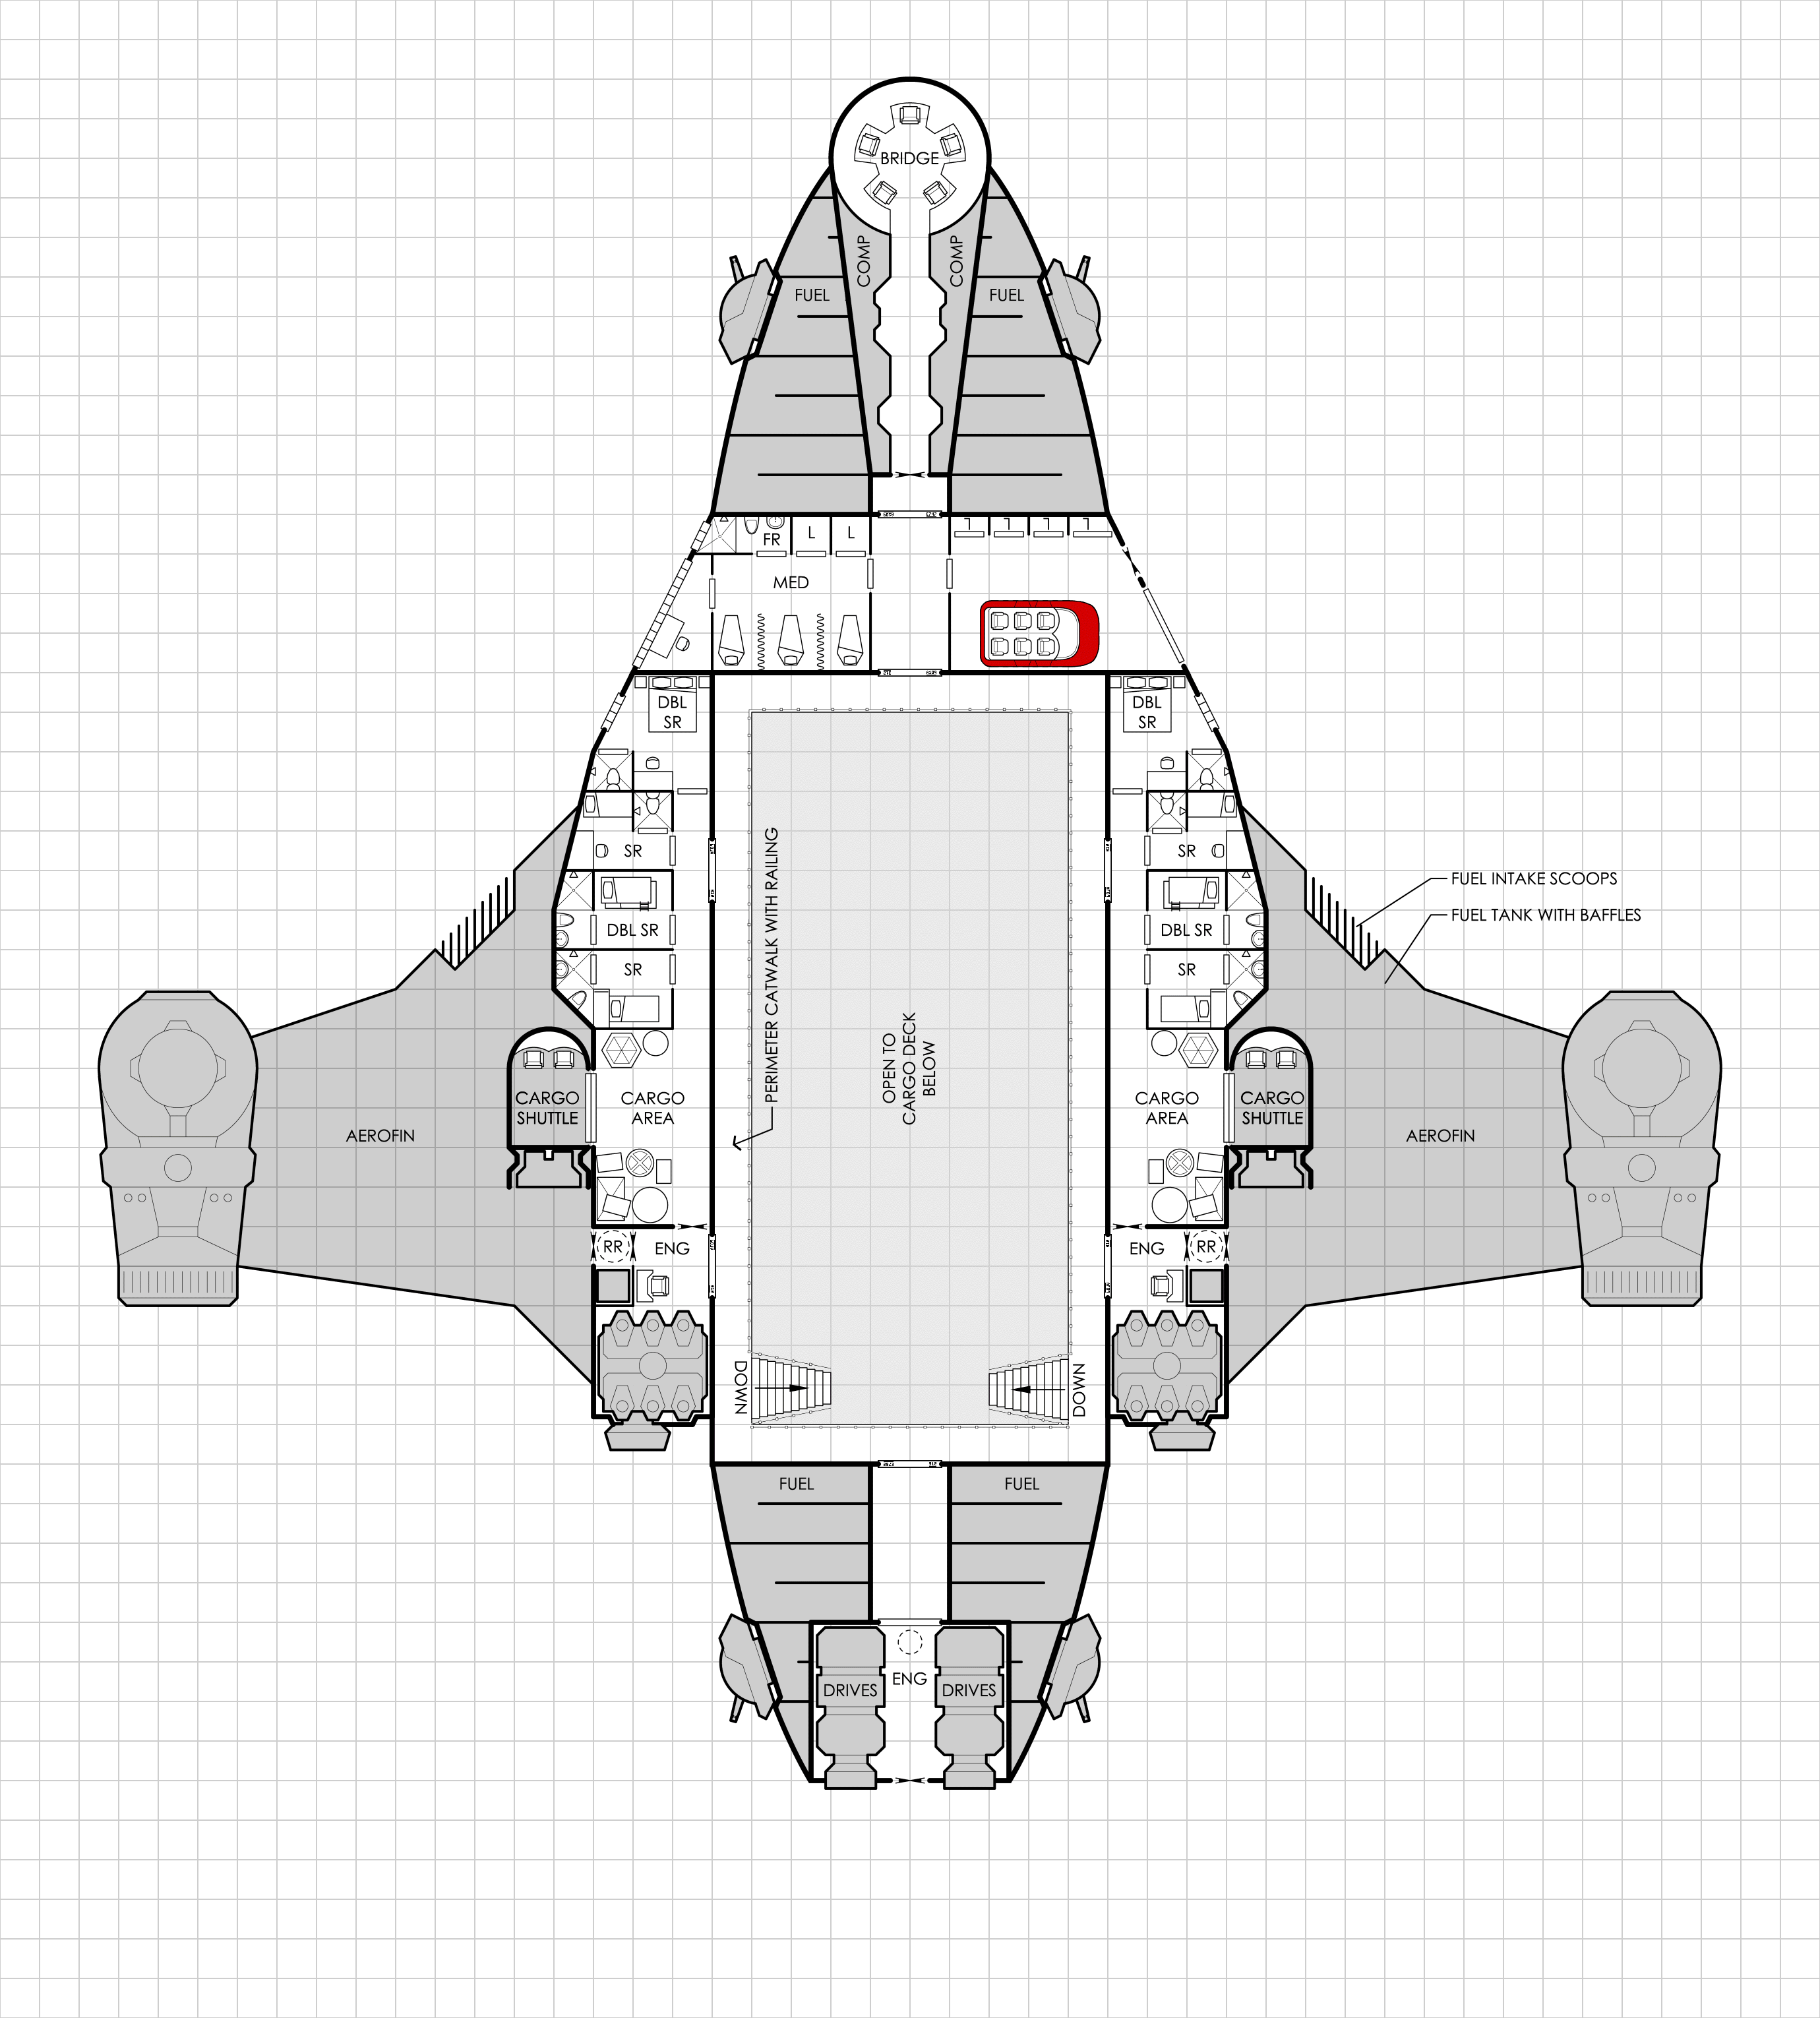
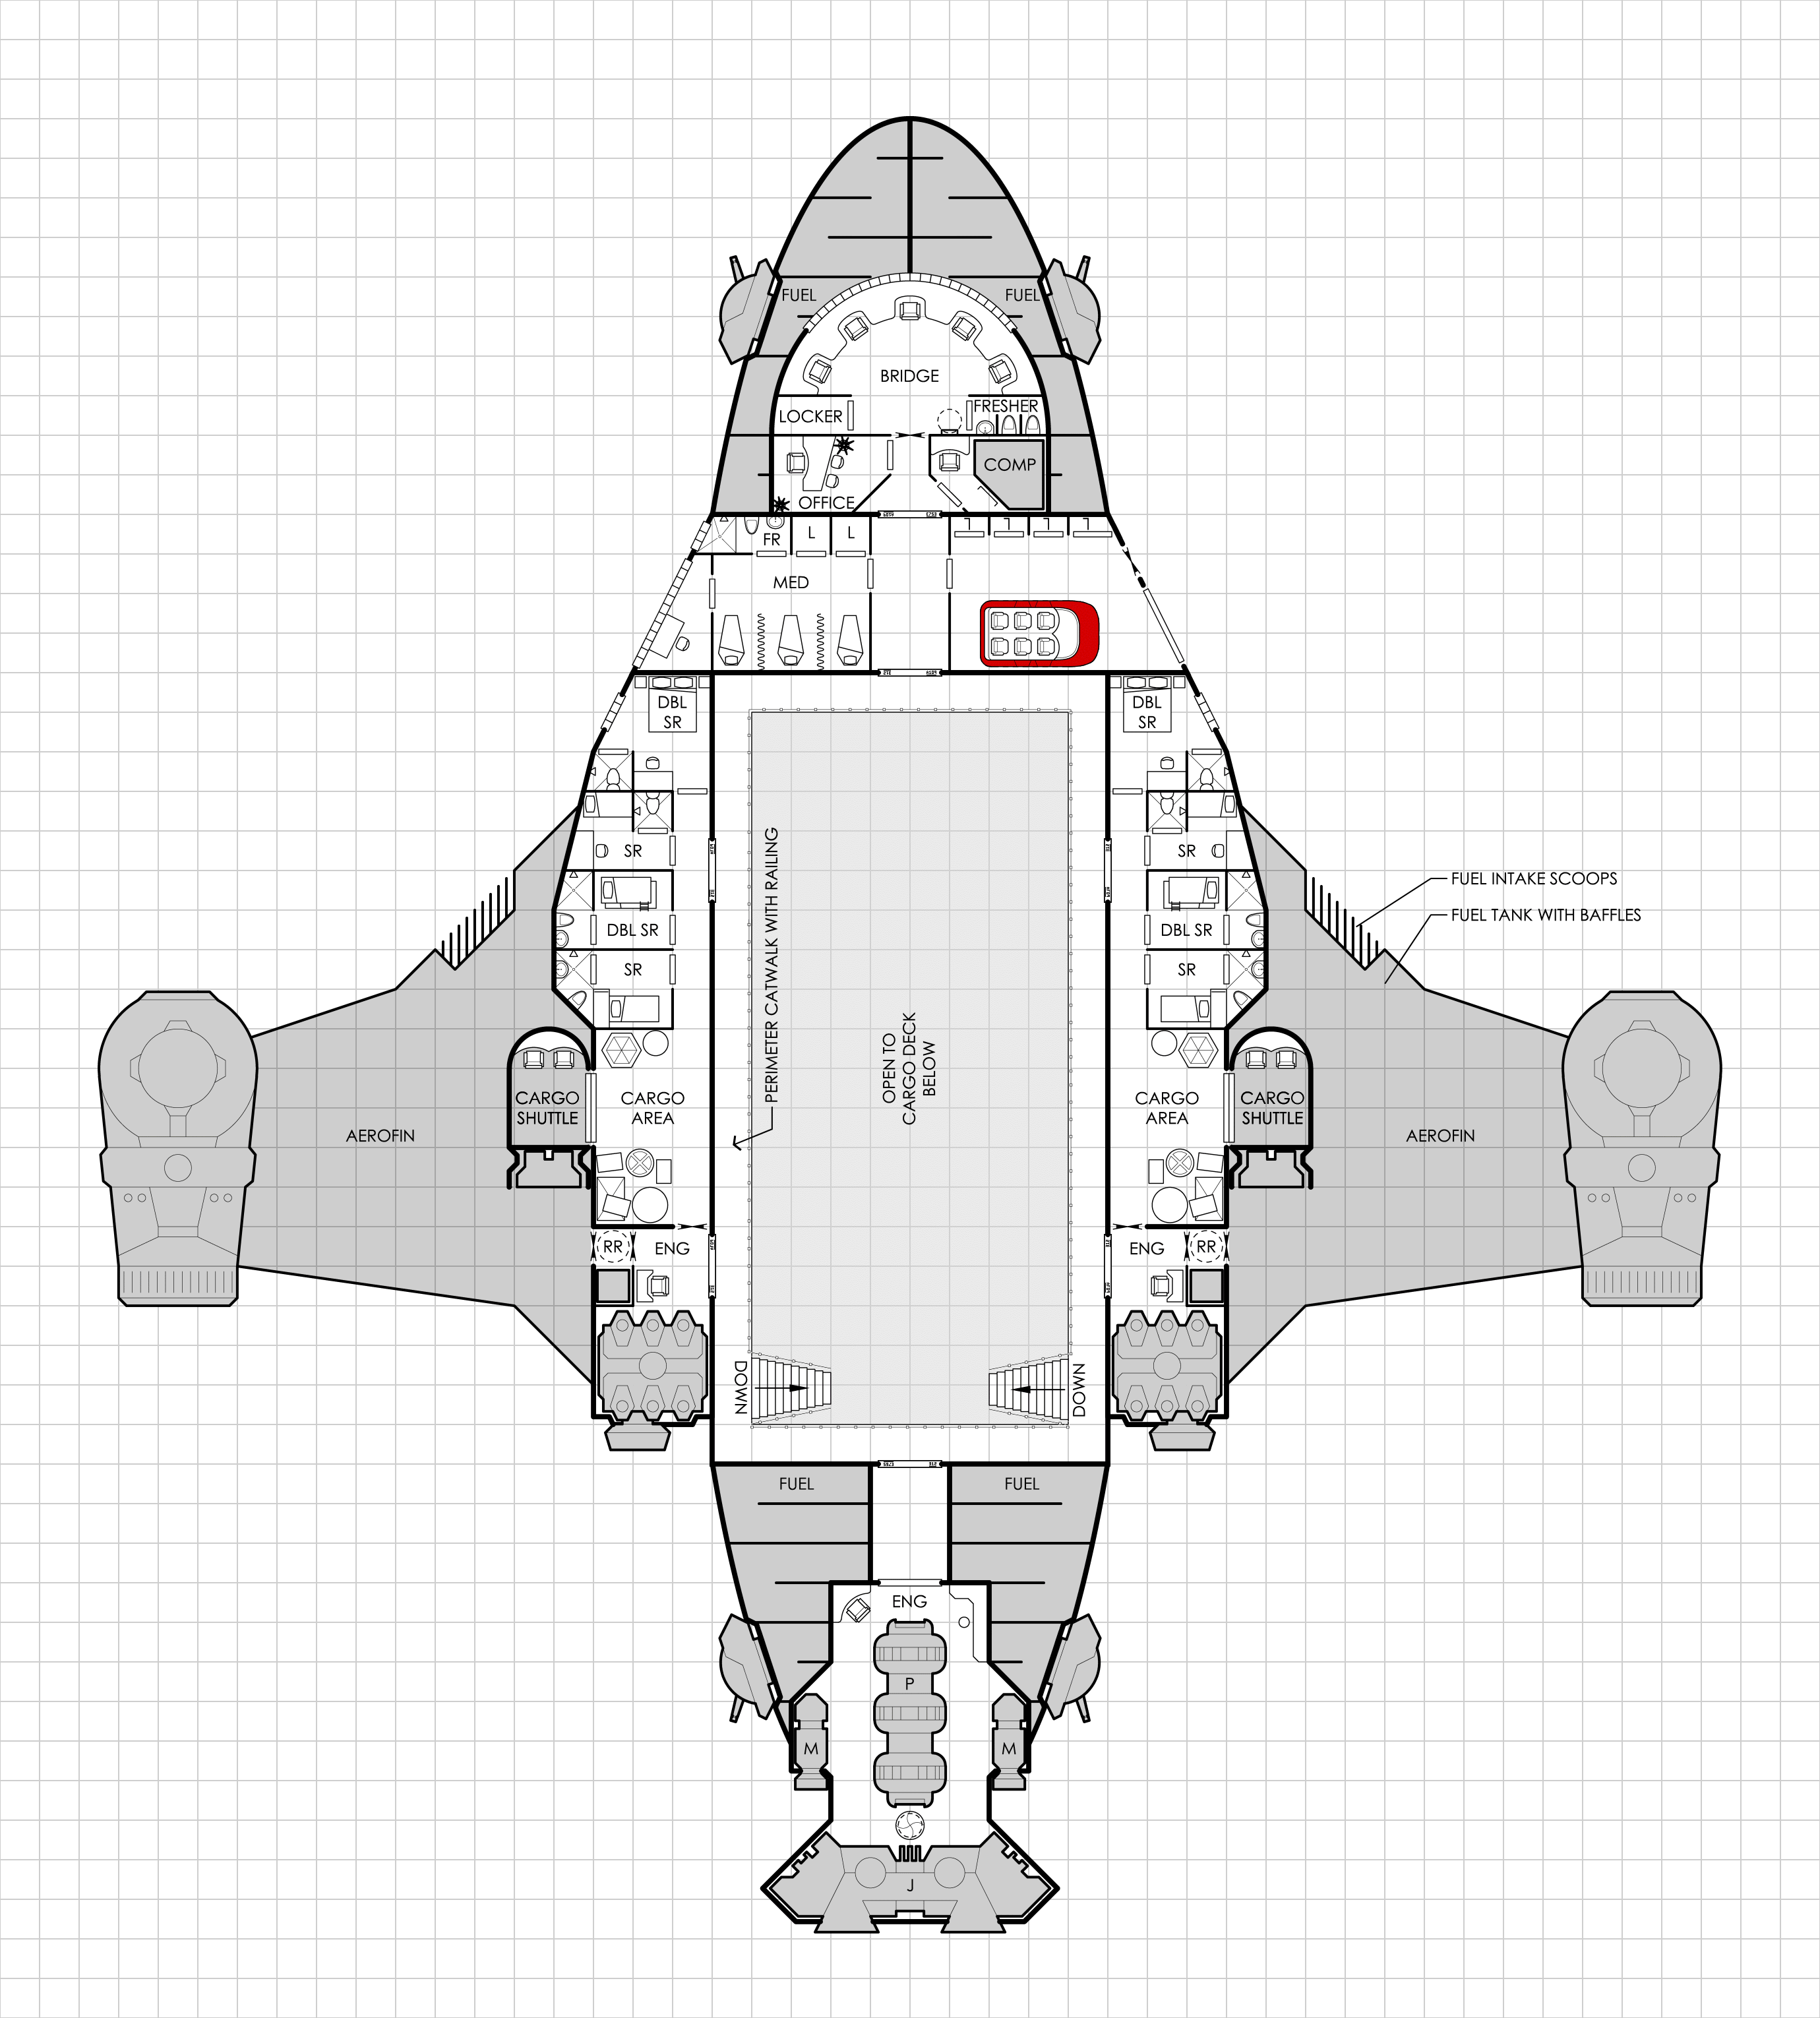
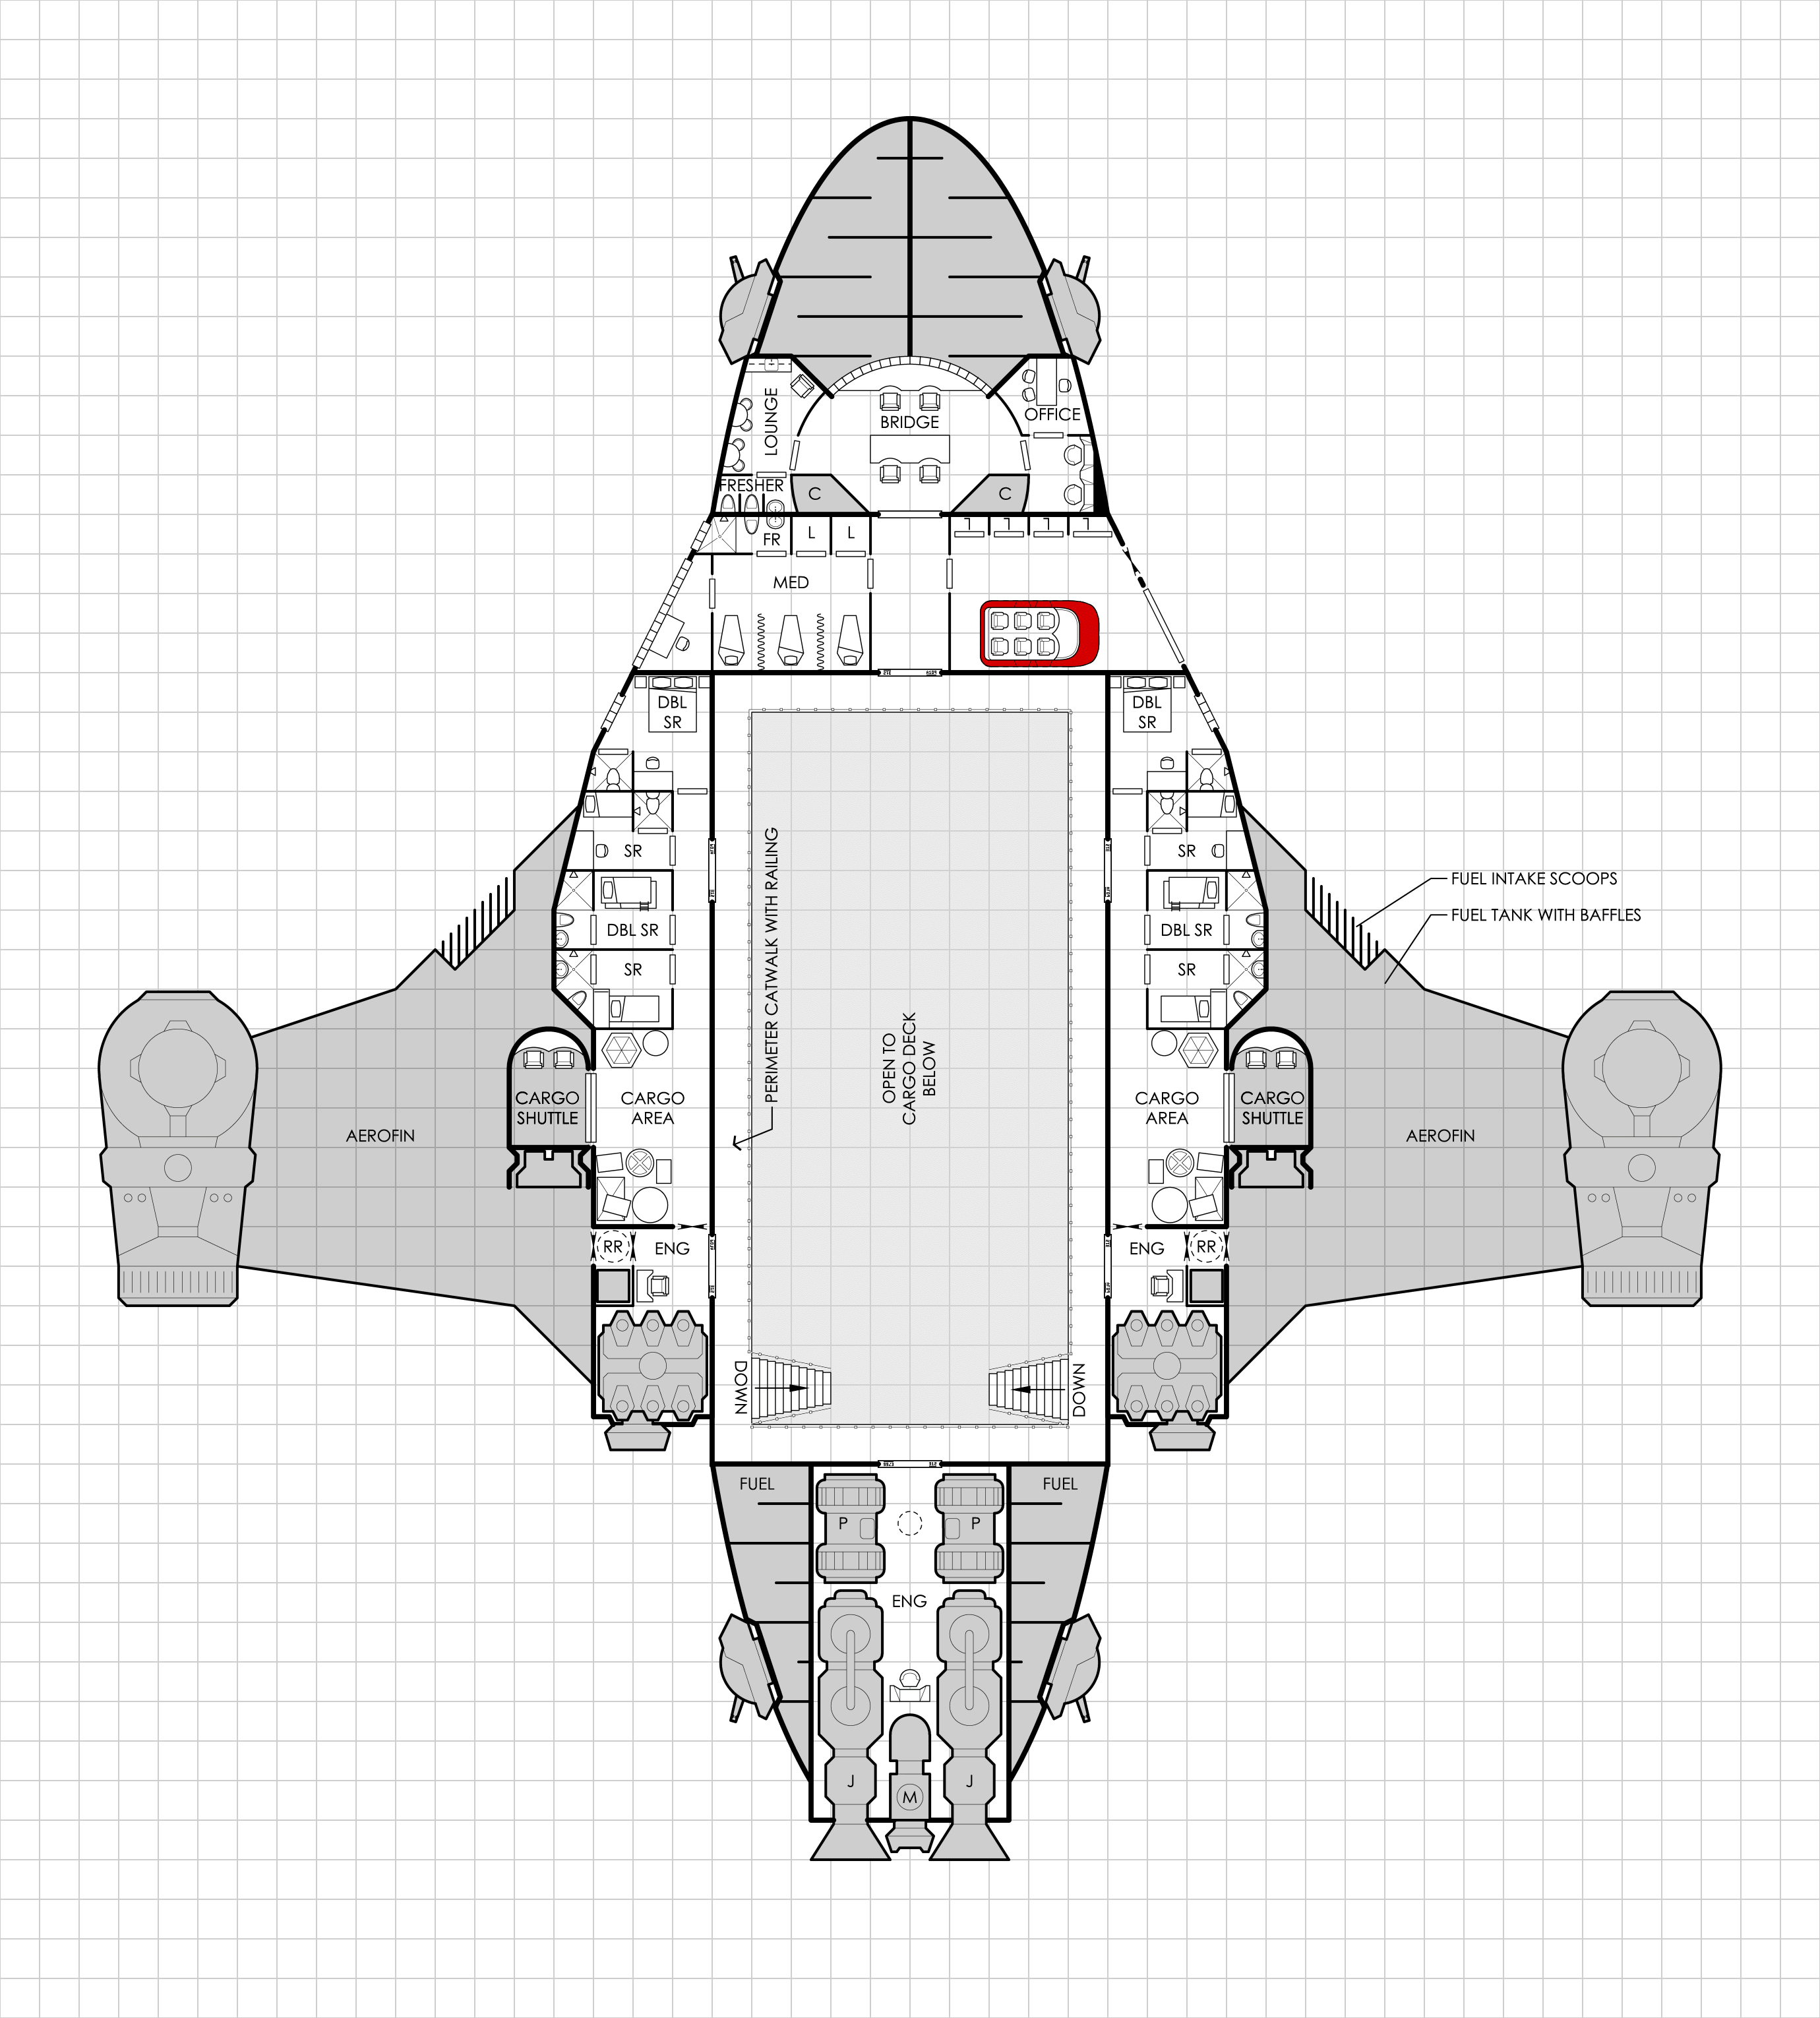
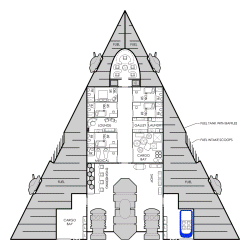
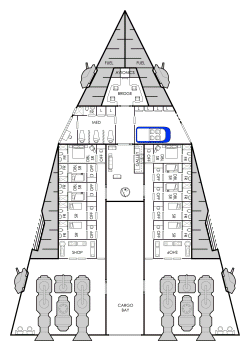
I call this one the Lightning Bug. It's my attempt at creating a small Serenity-esque cargo transport using the Geomorph tiles. I used several customized tiles for this design, and I did not bother to attempt recreate the layout of the Serenity, but rather just to keep the same basic feel of the small design of a starship wrapped around a cargo hold. There are two decks, each available in Hex or Square. The Cargo Hold is open through both decks, with the upper deck having a catwalk around the perimeter allowing crew to walk between the Bridge, Engineering, or the Crew Quarters found all around the cargo hold.
In version 2 of the ship I use some of the new tiles I've just added. There are five different bridge modules presented here, each with a different bridge module. Just behind the bridge is a connector I created just for the Aerofoil AF09 tile, which smoothly transitions the front of the Aerofoil into a standard 50' wide tile. In the updated archive there are some other transition pieces, including some with staterooms, blanks, and some to transition AF09 to smoothly match a 100' wide tile.
| Lower Deck Hex | Lower Deck Square |
| Upper Deck Hex | Upper Deck Square |

These long range medium-sized Courier/Scouts ships are Jump-4 capable. The Type-III is 225-dTons and has a crew of 9 and a small two small cargo bays. The Type-IV is 400-dTons, has a crew of 11, and a small and a large Cargo Bay. The Large bay has cargo lift and a dorsal hatch, allowing cargo to be loaded and unloaded through the top of the ship. Both feature several small turrets for self-defense and a large Air/Raft bay. The Type-IV has smaller second Air/Raft as well.
| Type-III Hex | Type-III Square |
| Type-IV Hex | Type-IV Square |
Another wedge-shaped design using new tiles I've added. This Jump-1 Cargo/Transport is a perfect small ship for PCs.
| Delta-Class Hex | Delta-Class Square |
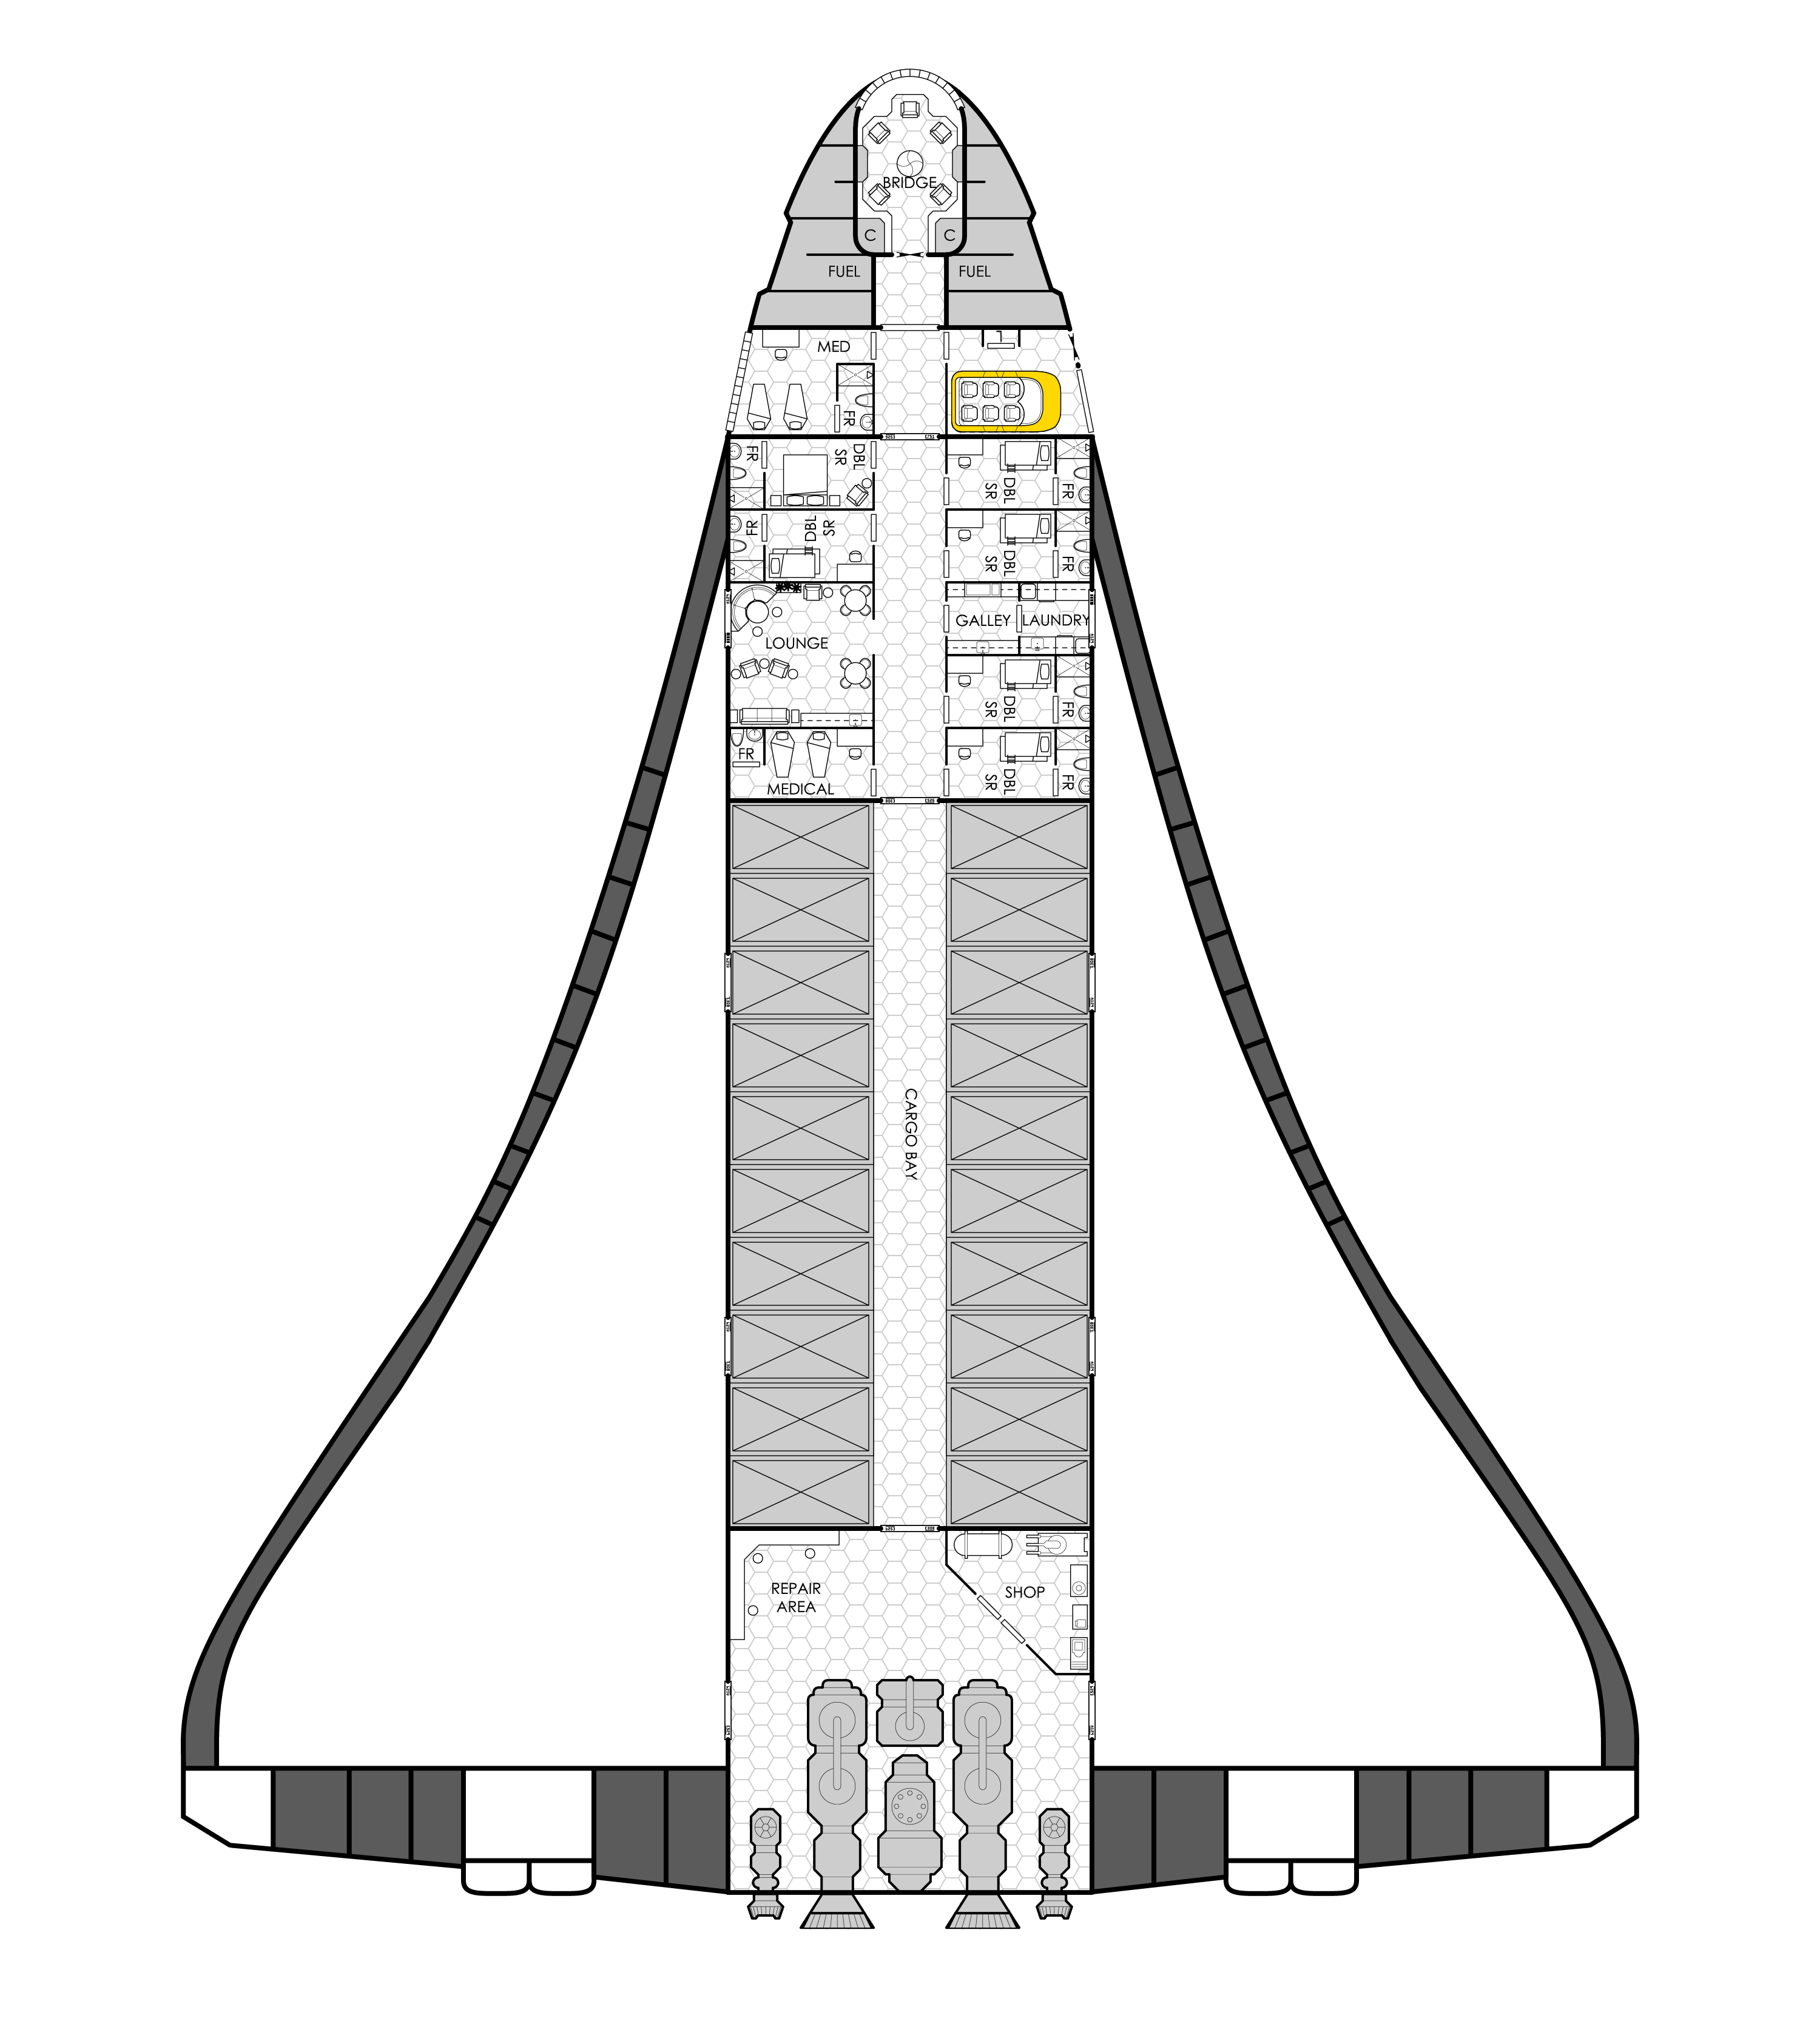


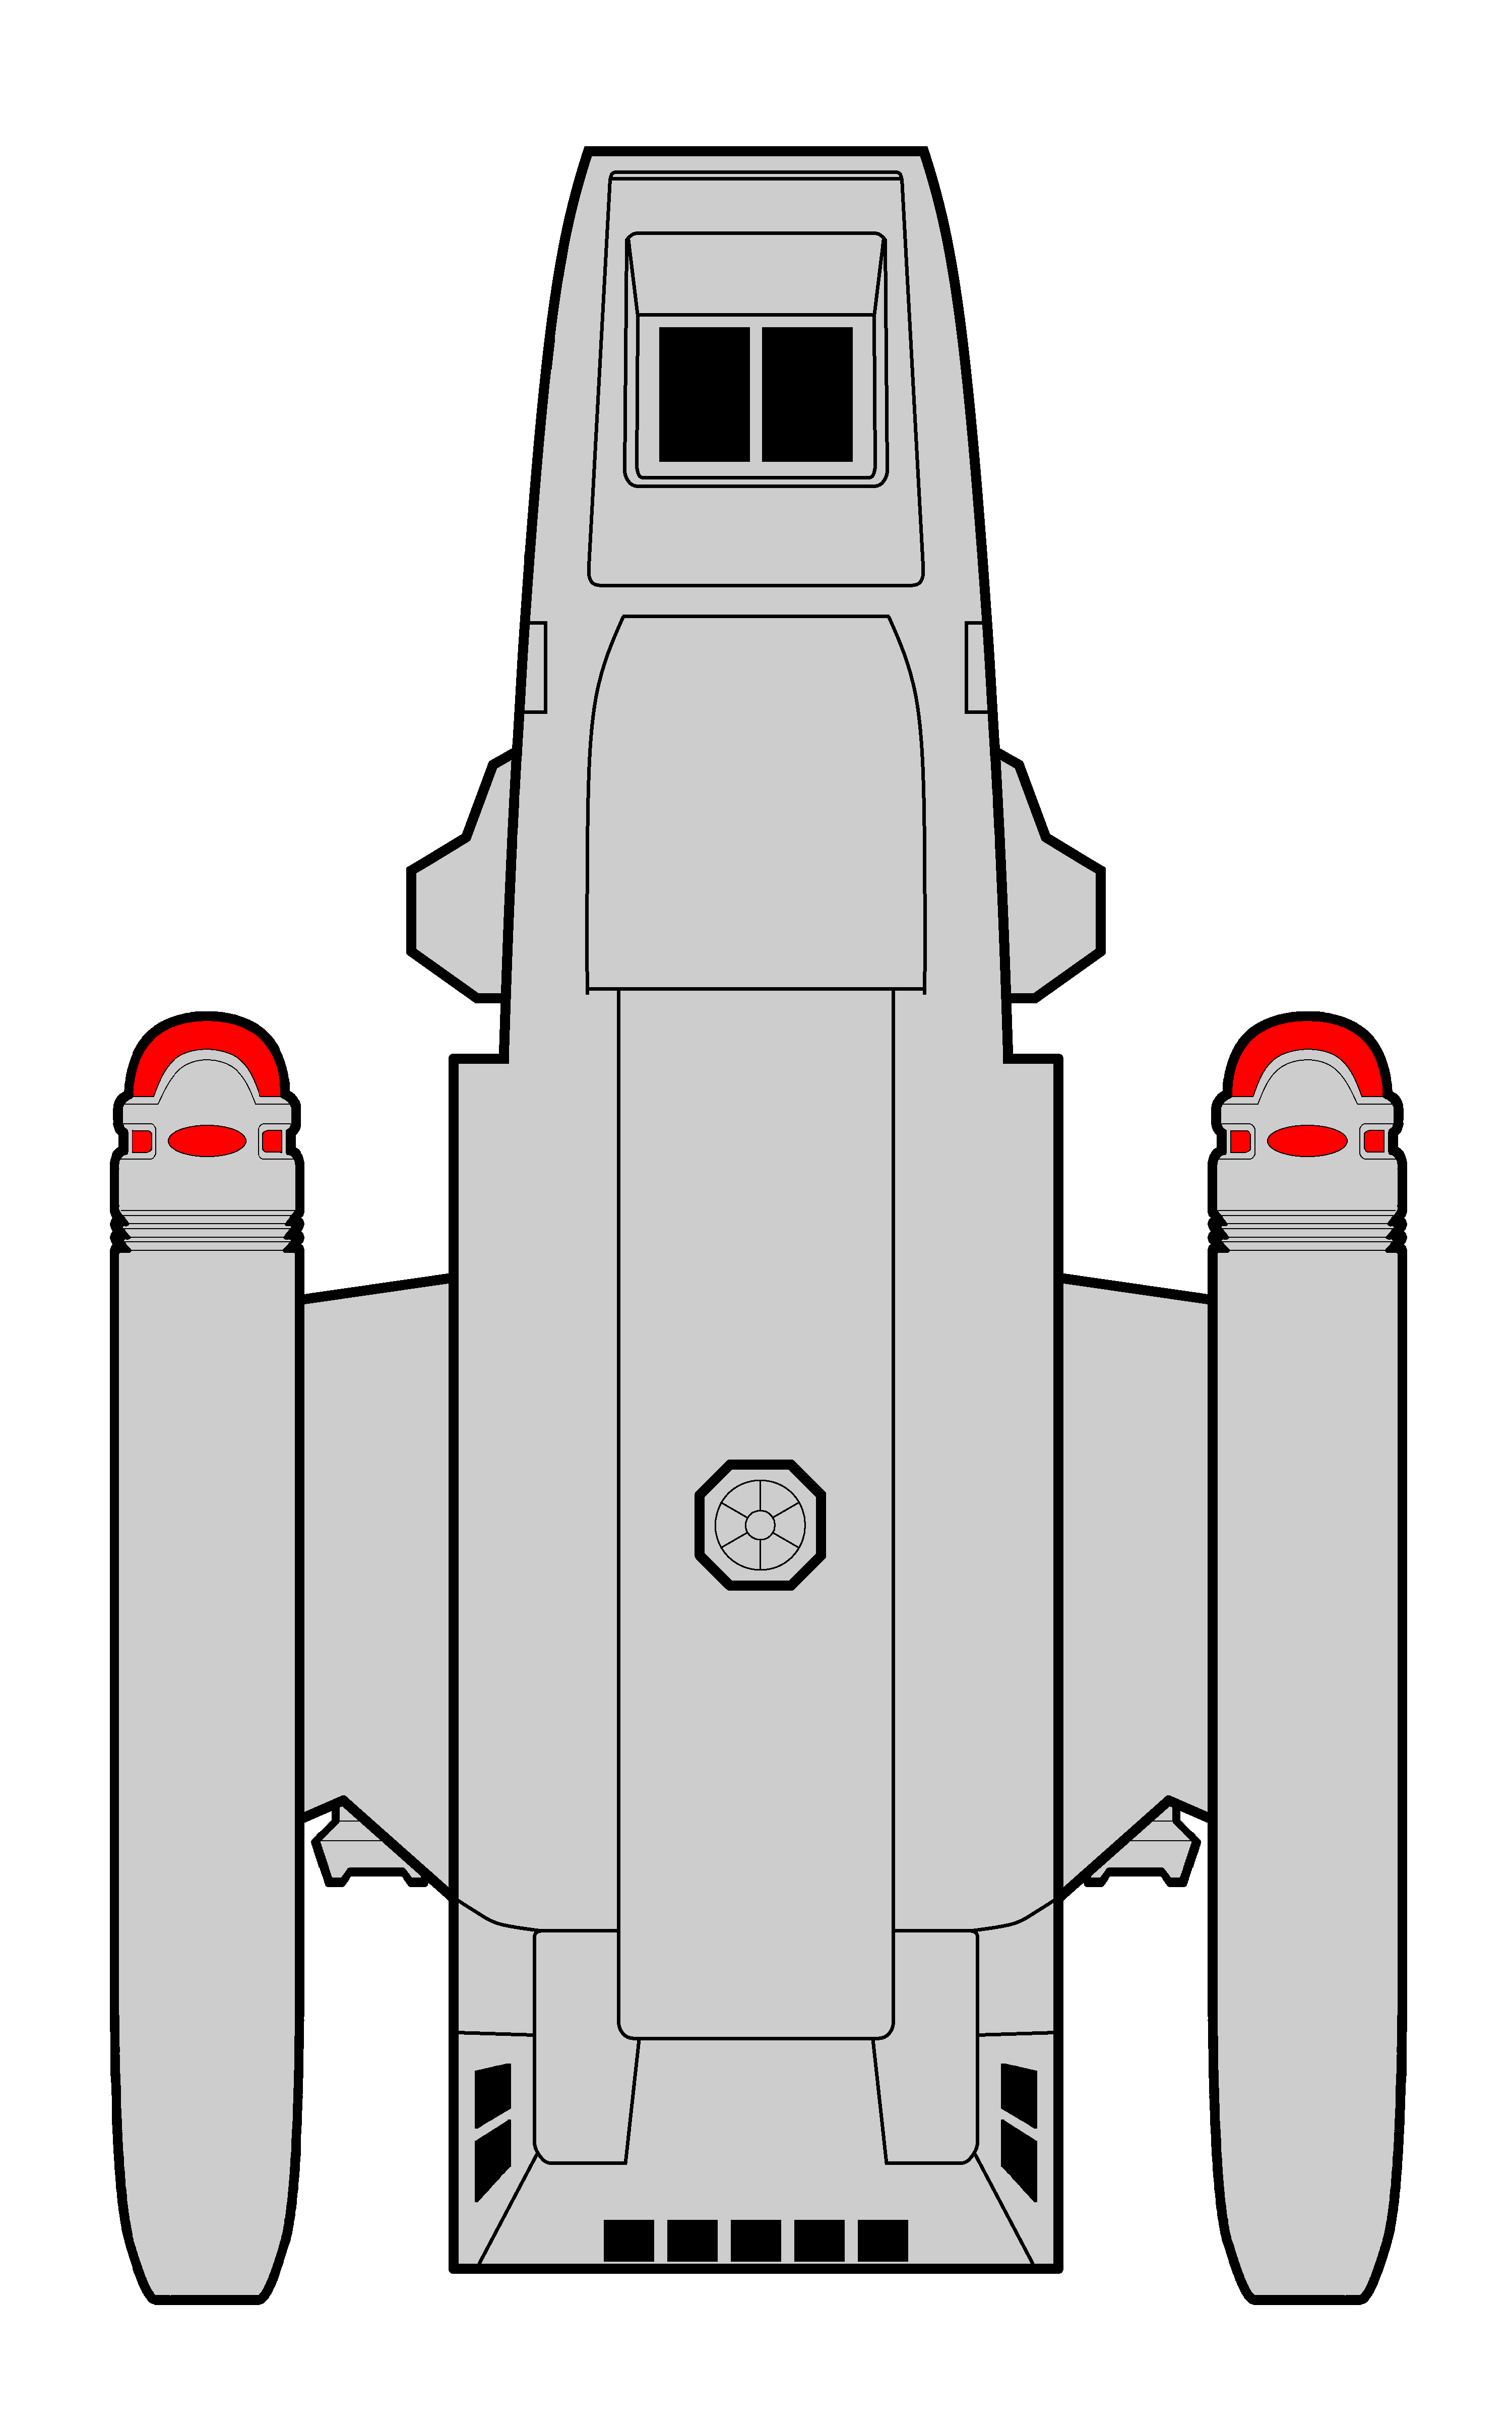
Another basic Shuttle I whipped up to show off the new Aerofoils I added to my Custom Tiles. The Aerofoils are based on real-world supersonic aircraft wings.

The 60-dTon Modular Runabout is a recent design which has quickly become a staple small craft of the Feder... Imperium. It's Engines, Power Plant, and Bridge module form a frame which smaller modules can be assembled inside to create a great deal of versatility in design while also keeping construction costs low. Fuel tanks extend under the main cabin, while the cabin can easily be designed or modified and changed at the owner's needs.
| Jump-Drive | Warp Drive | Jump-Drive | Warp Drive | |||||||
|---|---|---|---|---|---|---|---|---|---|---|
| Cargo 1 | Hex | Square | Hex | Square | Personnel Transport 1 | Hex | Square | Hex | Square | |
| Cargo 2 | Hex | Square | Hex | Square | Personnel Transport 2 | Hex | Square | Hex | Square | |
| Computer Operations | Hex | Square | Hex | Square | Personnel Transport 3 | Hex | Square | Hex | Square | |
| Covert Ops | Hex | Square | Hex | Square | Personnel Transport 4 | Hex | Square | Hex | Square | |
| Extreme Range | Hex | Square | Hex | Square | Power Plant | Hex | Square | Hex | Square | |
| Flag | Hex | Square | Hex | Square | Recreational | Hex | Square | Hex | Square | |
| Ground Assault | Hex | Square | Hex | Square | Science & Sensors | Hex | Square | Hex | Square | |
| Medical Transport | Hex | Square | Hex | Square | Science | Hex | Square | Hex | Square | |
| Passenger Transport | Hex | Square | Hex | Square | Special Operations | Hex | Square | Hex | Square | |
| Summit | Hex | Square | Hex | Square | ||||||

This is a larger Armed Cargo Transport. I wanted to create a ship using the Cargo Bay Megamorph. The only custom tile I used in this design is the corridor tile which allows the Bridge tile to sit centered on the rest of the ship. Like the Lightning Bug, the Cargo Bay is two decks high with the upper deck having a catwalk around the perimeter. Unlike that ship the crew does not have to traverse the Cargo Bay to get to Engineering, however they usually will since on both floors the fuel deck in the aft starboard side only contains a crawlway to get past the fuel tanks, while you can simply walk the catwalk to to get to Engineering. Still, if the Cargo Bay has been compromised and lost pressurization it's nice to be able to get around the ship without having to don a spacesuit.
| Deck 1 Hex | Deck 1 Square |
| Deck 2 Hex | Deck 2 Square |
Travel the Galaxy... in Style. This grand luxury liner is big. So big
I had to reduce the size of the map images by 50%. The higher resolution version of the ship is
available in PSD format in the Spaceships 3 archive
above.
This luxury liner is 820 feet from stem to stern and 300 feet wide, standing
four
decks high. It has accommodations for up to 590 people, including 17 Low Berths,
96 Pod Beds for crew, 32 senior crew in staterooms, and 441 passengers in single
and double staterooms, with many Luxury Suites available. There are 4 50-dTon Launches - two for fuel, two for
passengers and cargo loading, in addition to a 30-dTon Cargo Launch, an
Air/Raft, a small Cargo Shuttle, and 72 Escape Pods which are capable of launching
648 people.
![]() Deck
1 is the upper-most deck of the ship. Located here is a large swimming pool
under a stardome, the upper-half of a two-story Arboretum under its own stardome,
a casino, a bar with eateries, and a large restaurant with a rotating
dining area. Around the edges are over a hundred staterooms, including the best
luxury suites.
Deck
1 is the upper-most deck of the ship. Located here is a large swimming pool
under a stardome, the upper-half of a two-story Arboretum under its own stardome,
a casino, a bar with eateries, and a large restaurant with a rotating
dining area. Around the edges are over a hundred staterooms, including the best
luxury suites.
| Deck 1 Hex w/Dining & Dance | Deck 1 Square w/Dining & Dance |
| Deck 1 Hex w/Pool | Deck 1 Square w/Pool |
![]() Deck 2 has the Bridge in the fore, main Engineering in the aft, the lower-half
of that Arboretum, and and most of the guest staterooms. Peppered around the
deck are several galleys, lounges, and small bars. In the front section there is
a main airlock for docking, allowing
passengers to embark directly onto the passenger deck.
Deck 2 has the Bridge in the fore, main Engineering in the aft, the lower-half
of that Arboretum, and and most of the guest staterooms. Peppered around the
deck are several galleys, lounges, and small bars. In the front section there is
a main airlock for docking, allowing
passengers to embark directly onto the passenger deck.
| Deck 2 Hex | Deck 2 Square |
![]() Deck 3 is normally crew only, except during passenger embarkment and
disembarkment. The entire bow section contains the primary fuel tanks. This area
can make for a really good area to run a "hide and seek" chase scene
in, with several crawlways and one compartment completely hidden behind a
crawlway.
Deck 3 is normally crew only, except during passenger embarkment and
disembarkment. The entire bow section contains the primary fuel tanks. This area
can make for a really good area to run a "hide and seek" chase scene
in, with several crawlways and one compartment completely hidden behind a
crawlway.
Behind
them are the Upper Escape Pod bay and two docks for the 50-dTon Passenger and
Cargo launches. Behind that is the large, but not spacious, 96 pod beds sleeping
area for most of the crew. Also located on this deck are 22 staterooms for 32
senior crewmembers, a large central cargo bay and two smaller cargo bays on either side of the ship, and lower engineering. When the cargo bay is
not fully loaded it is sometimes opened up for crew activities.
Some variants of
the ship will replace the main cargo bay with a 240 pod bed passenger
accommodation
and load up the side cargo bays with 24 more escape pods. This variant brings
the total ship compliment up to 830 people, with escape pod capacity of 862
(plus the auxiliary ships).
| Deck 3 Hex Empty | Deck 3 Square Empty |
| Deck 3 Hex w/Aux Craft & Cargo | Deck 3 Square w/Aux Craft & Cargo |
| Deck 3 Hex w/Alt Passenger Bay | Deck 3 Square w/Alt Passenger Bay |
![]() Deck 4 is normally crew only, with most of the deck being taken up with fuel and
engineering. There is a 30-dTon Cargo Shuttle which launches from the liner's
belly which the Captain sometimes uses at his discretion to entertain VIP
passengers. This deck also contains the lower Escape Pod bay, launched
out of the belly of the ship. The upper escape pods launch through the lower bay,
once the pods in the lower bay have been launched. Also on this deck are six retractable fuel bays. When filled the ship can make Jump-2, but these can
be filled with cargo if the ship is only going to make Jump-1 for a particular
trip. In the far aft of this deck are two 50-dTon Fuel Launches, which are used
to aid in fueling the ship.
Deck 4 is normally crew only, with most of the deck being taken up with fuel and
engineering. There is a 30-dTon Cargo Shuttle which launches from the liner's
belly which the Captain sometimes uses at his discretion to entertain VIP
passengers. This deck also contains the lower Escape Pod bay, launched
out of the belly of the ship. The upper escape pods launch through the lower bay,
once the pods in the lower bay have been launched. Also on this deck are six retractable fuel bays. When filled the ship can make Jump-2, but these can
be filled with cargo if the ship is only going to make Jump-1 for a particular
trip. In the far aft of this deck are two 50-dTon Fuel Launches, which are used
to aid in fueling the ship.
| Deck 4 Hex Empty | Deck 4 Square Empty |
| Deck 4 Hex w/Aux Craft & Full Fuel | Deck 4 Square w/Aux Craft & Full Fuel |

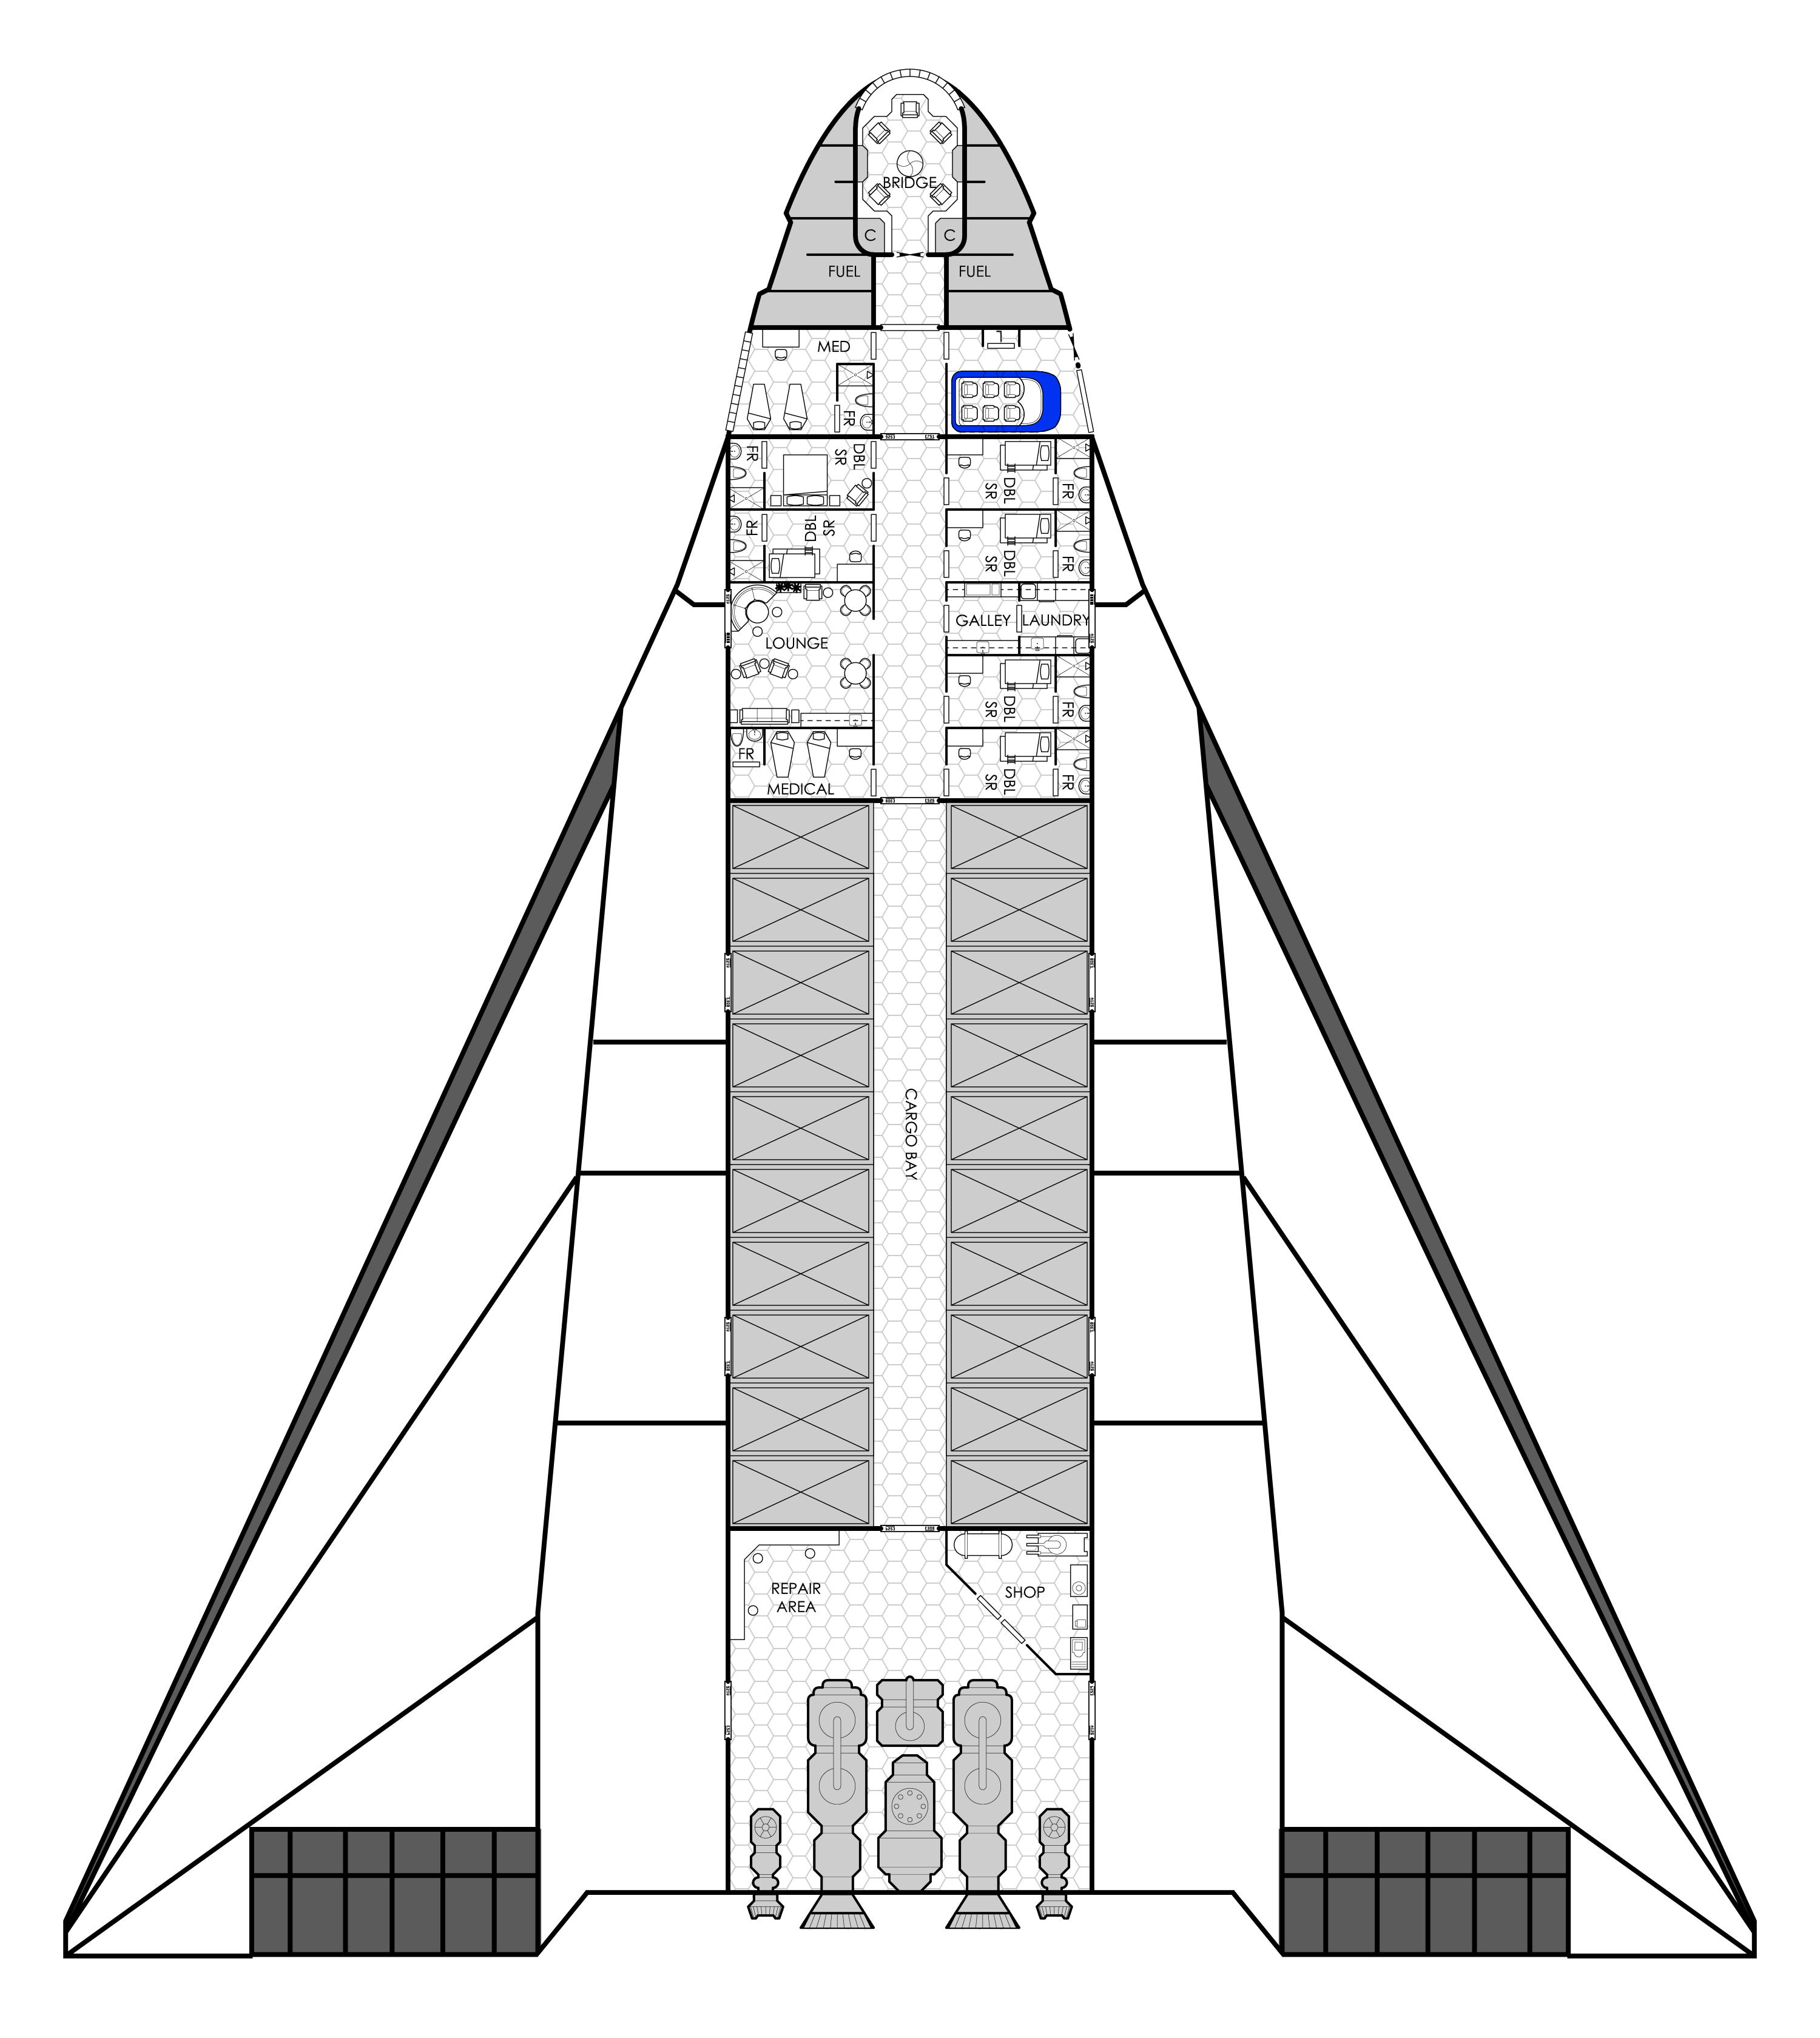
Sometimes you need to project force, and when you do the Bartizan is is what any smart Noble would want to use. With a length of 840 feet long, a beam of 400 feet, it stands five decks tall and carries 80 Rampart Fighters and 5 20-dTon Gunboats. Its crew compliment of just over 600 it has 159 Steerage triple bunk beds, 160 in double bunk bed Barraks, and stateroom accommodations for 294. The ship is capable of Jump 3, making it ideal to move quickly across sectors. It can refuel by skimming gas giants, but also carries two 50-dTon Fuel Launches. Normally, however, it would refuel by docking with a local fuel tenders or a fuel tender base. These maps are presented in half-resolution of the maps contained in the Spaceships 3 archive above.
![]() Deck
1 and 4 are laid out identically. Both have a large core of fuel tanks with
the periphery containing a mix of Barbettes (usually laser), Missile Launchers,
and Sandcasters deployed in all directions. The Fuel Tanks act to absorb blows
to the core of the ship which contains all the critical systems, including the
Flight Decks and Engineering.
Deck
1 and 4 are laid out identically. Both have a large core of fuel tanks with
the periphery containing a mix of Barbettes (usually laser), Missile Launchers,
and Sandcasters deployed in all directions. The Fuel Tanks act to absorb blows
to the core of the ship which contains all the critical systems, including the
Flight Decks and Engineering.
| Deck 1 Hex | Deck 1 Square |
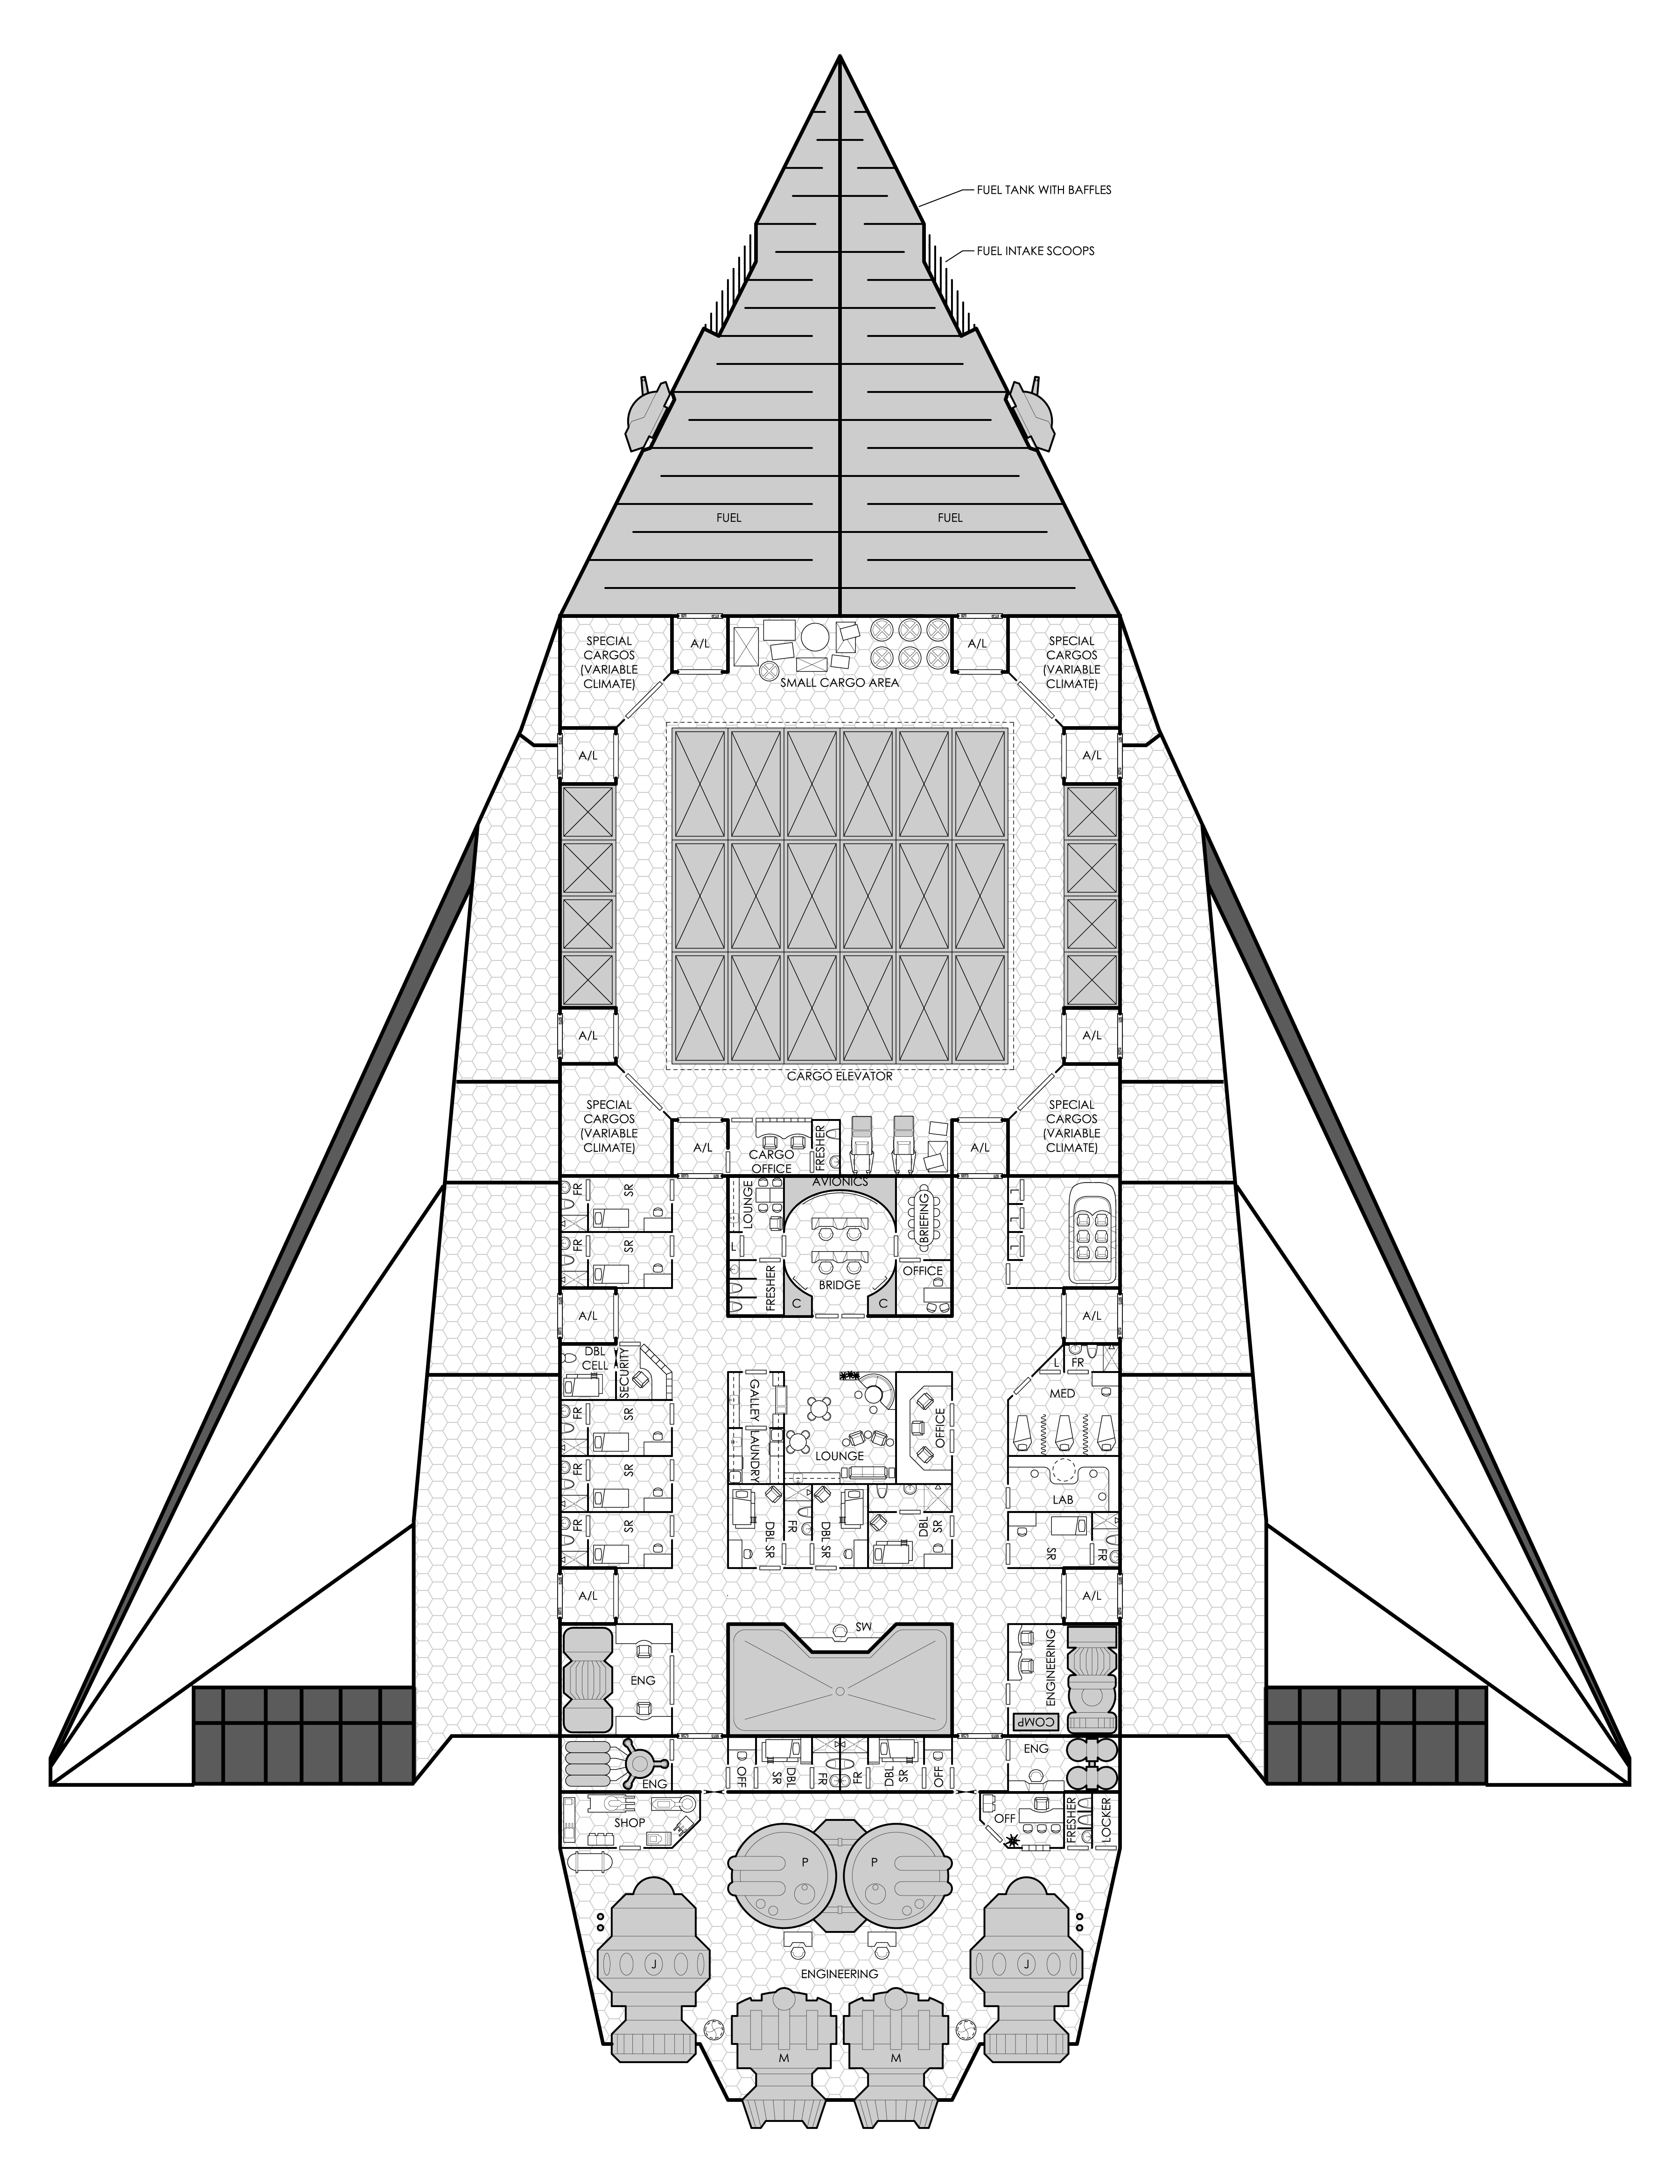
![]() Deck 2 has the Bridge in the
fore and main Engineering in the aft. Along the entire Port and Starboard
lengths are two large flight decks which launch the ships compliment of 80
Rampart Fighters. In the core are living quarters and Engineering.
Deck 2 has the Bridge in the
fore and main Engineering in the aft. Along the entire Port and Starboard
lengths are two large flight decks which launch the ships compliment of 80
Rampart Fighters. In the core are living quarters and Engineering.
| Deck 2 Hex | Deck 2 Square |
![]() Deck 3
is laid out similarly to Deck 2, with the Gunboat Flight Deck in the fore
sitting below the main bridge. In the core of this deck is a large Medical Bay
with surgeries, pharmacy, and a morgue. An alternate deck layout is presented
showing damaged versions of the fore port and starboard Flight Decks as well as
the aft port and starboard Engineering sections. This can be useful if the PCs
come across one of these ships and are attempting to salvage it.
Deck 3
is laid out similarly to Deck 2, with the Gunboat Flight Deck in the fore
sitting below the main bridge. In the core of this deck is a large Medical Bay
with surgeries, pharmacy, and a morgue. An alternate deck layout is presented
showing damaged versions of the fore port and starboard Flight Decks as well as
the aft port and starboard Engineering sections. This can be useful if the PCs
come across one of these ships and are attempting to salvage it.
| Deck 3 Hex | Deck 3 Square |
| Deck 3 Hex Damaged | Deck 3 Square Damaged |
![]() Deck 4
identical to Deck 1 (above), and is a combination of fuel and weapons.
Deck 4
identical to Deck 1 (above), and is a combination of fuel and weapons.
![]() Deck 5
contains more fuel, some cargo bays for carrying parts and supplies, and
72 escape pods capable of launching 648 crew. Combined with the fighters, the
ship is capable of launching it's entire crew compliment plus an additional 150.
Deck 5
contains more fuel, some cargo bays for carrying parts and supplies, and
72 escape pods capable of launching 648 crew. Combined with the fighters, the
ship is capable of launching it's entire crew compliment plus an additional 150.
| Deck 5 Hex Empty | Deck 5 Square Empty |

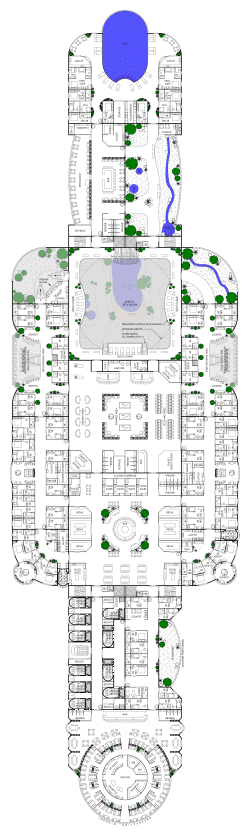
Not a starship. Instead I created an Apartment Complex layout using tiles from the Symbols set. I spent more time worrying about the layout than it took to actually create it once I got it figured out. There are four sample floorplans presented here:
![]() The Ground Floor has a Security station at the entrance and three
Laundry rooms available for tenants. There are 7 Apartments on this floor,
each with three Bedrooms, a Kitchen, Livingroom, and Bathroom. Approximately
1,100 square foot.
The Ground Floor has a Security station at the entrance and three
Laundry rooms available for tenants. There are 7 Apartments on this floor,
each with three Bedrooms, a Kitchen, Livingroom, and Bathroom. Approximately
1,100 square foot.
![]() The First Floor contains 8 Apartments. It is the same floorplan as the
Ground Floor, except the entryway and Laundry areas are replaced with an
extra Apartment.
The First Floor contains 8 Apartments. It is the same floorplan as the
Ground Floor, except the entryway and Laundry areas are replaced with an
extra Apartment.
![]() The Second Floor contains a different layout with 6 Apartments, each with
Four Bedrooms, Kitchen, Livingroom, and Bathroom. Approximately 1,400 square
foot.
The Second Floor contains a different layout with 6 Apartments, each with
Four Bedrooms, Kitchen, Livingroom, and Bathroom. Approximately 1,400 square
foot.
![]() The Third Floor contains a modified version of the Second Floor layout, with
two of the bedrooms from each apartment combined into a Master Suite and the
bathrooms expanded to Full Baths with tub.
The Third Floor contains a modified version of the Second Floor layout, with
two of the bedrooms from each apartment combined into a Master Suite and the
bathrooms expanded to Full Baths with tub.
| Ground Floor Hex | Ground Floor Square |
| First Floor Hex | First Floor Square |
| Second Floor Hex | Second Floor Square |
| Third Floor Hex | Third Floor Square |
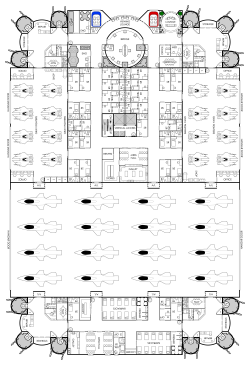
This is the type of well-armed base that PCs might find themselves having to sneak into or assault. It is 3 stories tall, measuring 200x300 feet. It has single & double staterooms for 175 personnel and Barracks for 100-200 more ground troops.
![]() The Ground Floor has a ring of ground vehicle bays, with a total of
20 Mechs, 12 Grav Tanks, 4 G-Carriers, 4 Wheeled ATV, and 36 Grav Bikes. The
interior of this level features a medical facility with surgeries and living
quarters.
The Ground Floor has a ring of ground vehicle bays, with a total of
20 Mechs, 12 Grav Tanks, 4 G-Carriers, 4 Wheeled ATV, and 36 Grav Bikes. The
interior of this level features a medical facility with surgeries and living
quarters.
![]() The First Floor is dedicated to living quarters, with turret
Barbettes on each corner for defense. This floor houses the main Power Plant for
the facility.
The First Floor is dedicated to living quarters, with turret
Barbettes on each corner for defense. This floor houses the main Power Plant for
the facility.
![]() The Second Floor has a fly-through fighter bay housing 16 Rampart
Fighters and two smaller fighter bays housing 16 Grav Fighters. Like the
previous floor it contains living quarters and corner turret Barbettes. It also
has the base's control room, which has two Air/Rafts available for the command
staff.
The Second Floor has a fly-through fighter bay housing 16 Rampart
Fighters and two smaller fighter bays housing 16 Grav Fighters. Like the
previous floor it contains living quarters and corner turret Barbettes. It also
has the base's control room, which has two Air/Rafts available for the command
staff.
![]() The
Roof is set up as a giant landing pad. It can fit 1-2 large starships
such as the Type-I Scout/Courier or a Free or Far Trader. It can also fit
several other smaller craft, including at least four 50-dTon cutters and two
20-dTon Shuttles.
The
Roof is set up as a giant landing pad. It can fit 1-2 large starships
such as the Type-I Scout/Courier or a Free or Far Trader. It can also fit
several other smaller craft, including at least four 50-dTon cutters and two
20-dTon Shuttles.
| Ground Floor Hex | Ground Floor Square |
| First Floor Hex | First Floor Square |
| Second Floor Hex | Second Floor Square |
| Roof Hex | Roof Square |
Starship Geomorphs v2.0 is Copyright © 2020 by Pearce Design Studio, LLC and is licensed under a Creative Creative Commons Attribution Non-Commercial 4.0 International License.
The Traveller game in all forms is owned by Far
Future Enterprises. Copyright 1977-2020 Far Future Enterprises.
Traveller is a registered trademark of Far Future Enterprises. Far
Future permits web sites and fanzines for this game, provided it contains
this notice, that Far Future is notified, and subject to a withdrawal of
permission on a 90 days notice. The contents of this page are for personal,
non-commercial use only. Any use of Far Future Enterprises's copyrighted
material or trademarks anywhere in these documents should not be viewed as a
challenge to those copyrights or trademark.
This work is Copyright © 2020 by Eric
B. Smith and is licensed under a Creative
Creative Commons Attribution Non-Commercial 4.0 International License.
